A Comprehensive Guide to Crystalline Conflict
This guide is intended to provide an overview of CC for beginners and intermediate players alike. It is a work in progress! Please check back for updates.
Class Guides
Tanks
Healers
Melee DPS
Physical Ranged DPS
Magical Ranged DPS
Terms
AoE - Area of Effect
Burst – High damage in a short amount of time
CC - Crystalline Conflict
cc - Crowd Control
CCRC - Crystalline Conflict Regional Championship 2023 (FanFest CC Tourney)
CD - Cool Down
DoT - Damage over Time, abilities that deal periodic damage over a set amount of time rather than upfront
Elixir - Standard Issue Elixir skill that restores full HP and MP
FRC - The Feast Regional Championship 2018 (FanFest Feast Tourney)
Gank - To kill someone, typically as a target of opportunity
LB - Limit Break
LP - Light Party, a holdover term from the Feast days, this means organized team play which you can do in duty finder. This typically applies to tournament play.
LoS - Line of Sight
MM - Matchmaking
MoN/Poly/Imp - All terms used to describe White Mage's Miracle of Nature ability which is the most powerful cc in the game.
Morb - A reference to the movie nobody has watched, means to play exceptionally well in a match, usually killing many enemies
Rat - To go deep behind enemy lines with the goal of denying elixirs, drawing multiple enemies away from the team fight, or general harassment
Recupe - Recuperate, the skill that heals you at the cost of MP
Scrimms - Custom practice matches organized by LP teams or community events
Skittle/Orbs - The red orbs left on the Volcano map after an explosion
SoloQ - Short for Solo Queue, playing Crystalline Conflict, typically with reference to ranked play
Snapshot - When an ability registers its execution with the server
Wise Man - Began as a meme in the revival discord, it means pushing the crystal, sometimes because the other team isn’t paying enough attention to it
About & Dedication
About
My guide project began just two weeks after CC came out. I deeply enjoyed the game mode but was also frustrated that there didn’t seem to be any centralized guide to learn from. As a nerd who likes to read things to improve, I decided I’d set out to write the thing I wish someone else had. (Be the change you want to see in the world and all that.)Since then, the original guide which came to span some 40 pages became fairly outdated as metas shifted and the PvP community began to adapt to the game mode. Rather than attempt to re-write the whole thing with my average knowledge of each class, I figured for the purposes of this major revision it would be much better to have the real experts write the guides for their classes. Wherever possible I sought out the top players of the (primarily Crystal) data center for each class to write their own guide. Classes I couldn’t get authors for have been written by myself and reviewed by a community of strong players to help flesh out.In migrating the guide out of a unwieldy google document and into an unwieldy-but-prettier Carrd page the project is moving in stages. The website is currently working through Stage 1.Stages:
1) Guides are written and uploaded for each class in at least a text only format.
2) Images are uploaded to each guide making them more visually appealing and easier to digest.
3) Images linked to FFXIV API to utilize Lodestone’s ability descriptions, futureproofing class changes
4) Videos are uploaded (or linked) to help break out certain concepts or provide examples where possible.There are many people I am indebted to through this project, and each person who was willing to be identified has had their name listed at the bottom of their page. Those who wished to remain anonymous have been marked as such.
Dedication
This project is dedicated in memory of Tony Pajamas, one of the first editors of the original guide. Tony Pajamas, real name Clayton Hightower, was a member of the FFXIV PvP community and an American Marine Corps combat veteran. He believed strongly in the national sovereignty of Ukraine and had served there prior to the renewed Russian invasion of 2022. Well aware of the risks, he chose to serve again in this war believing that it was better for a veteran such as himself to fight than for some poor 18-year-old to be drafted in his place. In December 2022 he was killed in action while performing life-saving CPR on a downed squadmate under fire. Tony was an incredibly charismatic and outrageously hilarious person. He was often found burning away the midnight oil in voice chat with many of us, spinning a yarn about his crazy life experiences and keeping us all laughing. We are led to believe he did much the same for the squad with which he fought.Tony is incredibly missed by the community and his heroism and example will be remembered by us all. Till Valhala, brother.Slava Ukraini, Heroyam Slava.
-Verre Bellareve, Mateus
The Square Enix CC guide (linked above) does an excellent job of running through the basics. If you are absolutely new to the mode I highly suggest reviewing it for guidance on Maps, Map Events, Items, User Interface, and the Progress Bar.All of these will be incredibly important to playing the game.

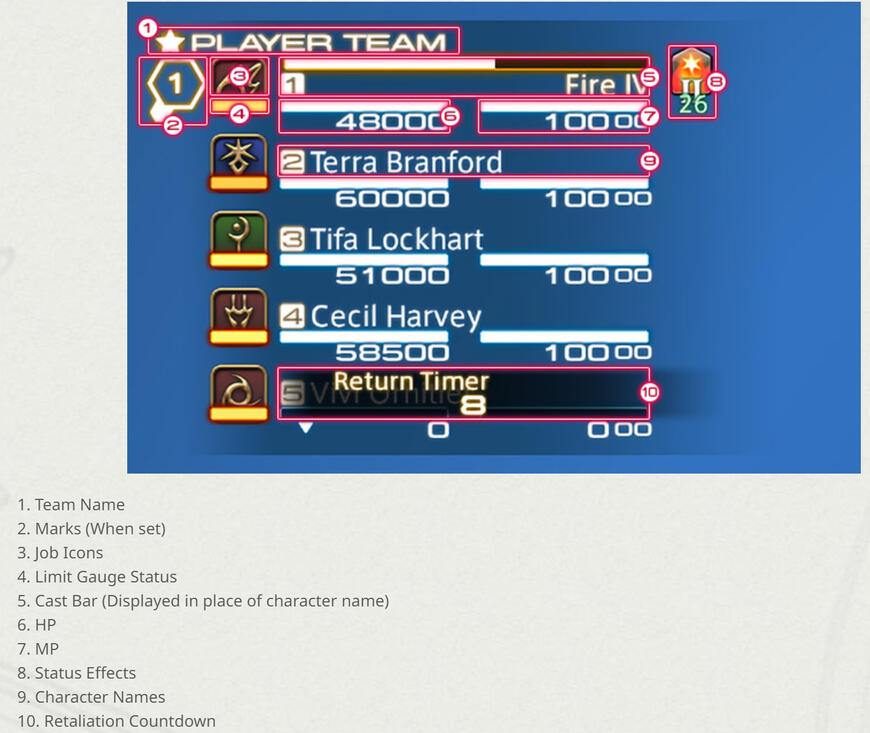
Worth drawing extra attention to is the LB bar under the portrait of any player's job icon. This is #4 in the image above. LBs are essential to winning team fights and have major game changing potential. To play well, you'll need to be alert to both your team and your enemy's bars, especially when full!
How the Classes Play
Tanks
Paladin: Traditional tank, can take all damage for a teammate which lets them elixir in combat.
Warrior: Hybrid of tank and dps, great utility with a stun and grab and the only guard-breaking and extended anti-guard LB.
Dark Knight: More traditional tank, can sacrifice health on demand for OGCD damage, very hard to kill in lower leagues.
Gunbreaker: More a DPS than a tank, can adapt by “Junctioning” an enemy tank, dps, or healer to change one of their own abilities to either a tank, dps, or healer version.


Melee DPS
Monk: An absolute bully of a class, almost more a tank than just a DPS, hard to kill, very fast filling LB, great at single target but weak on AoE.
Dragoon: One of the highest damage dealers, can deal the most significant and consistent AoE damage of the Melee DPSs.
Ninja: A headhunter, exceptionally good at murdering an enemy’s backline if ignored, with a repeatable guaranteed kill LB that can snowball a fight in their team’s favor.
Samurai: A cudgel of a DPS, can deal high damage but with cast times that can feel clunky.
Reaper: Works a bit like Machinist’s Wildfire, stockpiling damage across a time span that hits for 50% of the total dealt when it expires. Slightly tankier than Dragoon, Ninja, and Samurai but lower damage output; guard-breaking, non-purifiable fear LB.
Physical Range DPS
Bard: A support damager that does not have the highest damage output but boosts the team’s overall damage percentage and recharge rate while confirming or initiating kills with well placed silences.
Machinist: High damage but no team boosts, especially good at dealing with guarding enemies and picking off troublesome individuals.
Dancer: Blend of damage and support, providing buffs to its Dance Partner only and a Guard Breaking LB; can do more damage than you’d expect in the right hands.


Magical Ranged DPS
Black Mage: Post 6.15 BLM is back to being a strong DPS with incredible cc, but no longer incredibly overpowered.
Summoner: Strong damage, particularly with an LB that can hammer a whole team in a large area.
Red Mage: More of a melee than a ranged caster, its highest damage comes from its melee burst phase. Incredibly capable of destroying a target or chasing them down until they can.
Blue Mage: Not available in CC, sorry!
Healers
White Mage: Hybrid, good balance between heals and damage with incredibly strong LB and cc.
Scholar: A turtle-like strategy and often overlooked, less about healing and more about damage through a DoT that reduces damage done and a buff to teammates increasing damage done.
Astrologian: Most traditional healer, can do some decent damage, LB is a short-but-strong team-wide DPS boost.
Sage: More a DPS than a healer. Direct healing limited to Kardia’d teammate, game changing LB that creates an immunity field that also does significant damage.

Tier Lists
The most important thing is to play a class you enjoy!Every class can be played at the highest level with no exceptions. The only difference is some classes are much more accessible to beginners than others. These lists were made with input and consensus from a large handful of skilled PvPers.
Tier List Logic
S - Extremely powerful, can determine the course of a match by their power alone and are simple to play
A - Very powerful, can often carry a match and are not too complex
B - Strong but not as easy to carry bad teammates and have higher skill complexities
C - Capable but have higher skill requirements than others
D - High skill requirement, high reliance on teammates, very hard if not impossible to carry with
It's important to acknowledge that the definition of S increases for all jobs as you get better with them. This is by no means a list reflective of class capabilities, so much as the ease with which a new player can learn them. All the low rated jobs are incredibly powerful in the right hands.For this reason, there is no Crystal/t100 tier list. Any class is viably competitive depending on the player.There is no meta that invalidates any class.
Unranked - Plat
New Player Ease of Climb Tier List

Plat - Diamond
Assuming Average Player Skill

Paladin

Pros
Enables in-combat Elixir reset for allies
Incredible team fight control
Great survivability
Powerful stun
Cons
Lowest damage output
Highly vulnerable to cleave
Heavily affected by server tick
Can be killed during LB activation
Playstyle(s):
Guardian Angel:
This playstyle is particularly useful against enemy teams that are quickly able to ensure kills.
Paladins have the ability to completely nullify a kill with their Guardian+Guard combo & your goal in this playstyle is to keep distance & stay alive until you need to swoop in to save an ally with your Guardian. Before an engagement begins, move back to create some distance. You don't need to take unnecessary cleave damage.
In this role you're able to keep an eye out for potential enemy LB's, assist in focusing down kill targets with your Confiteor & charging in to help finish off with a shield bash.
Do NOT stay in the midst of the fight for too long after you do engage. Your health, MP & defensive ability cooldowns are necessary for ensuring a successful cover. Unless the match requires you to hold the point you should disengage & use your Elixir whenever possible.
Crystal Centric:
This playstyle is particularly useful against slow-burn teamfights where you're not often in direct danger.
While Paladins are best utilized for their covers, their staying power is not to be ignored either due to the Slow associated with their Holy Sheltron, low cooldown stun with their Shield Bash & their health recovery with each Royal Authority, particularly when combined with Confiteor.
In this role you will focus on surviving while contesting/moving the Crystal & stunning or using Confiteor on kill targets where useful.
While holding your ground is important, just as with the Guardian Angel playstyle, you still need to retreat & Elixir wherever possible. It's essential to learn when to swap between the two styles of play.
Basics
General:
Use Confiteor on kill targets, ideally into groups of enemies. The debuff left on enemies heals your teammates when they attack the target.
Ensure kills on low-hp targets by charging into Shield Bash.
Never stay in the teamfight for long unless you have to or are not being attacked.
Some players do not know they can Elixir while covered, try and learn who can & who cannot Elixir.
Try to use your LB blade combo on a single target where possible for maximum damage
Opener:
Try to use a Confiteor on the kill target & keep your distance. Holy Sheltron if you think the enemies will dive you.
Prepare to cover any teammate out in the open. If the enemy team dives them and they haven't guarded, chances are that you will need to Guardian them.
In most cases you should never charge in first but against low damage teams you can so long as you guard fast & early. Ensure that you Elixir so that you'll be able to Guardian+Guard when they're off Cooldown.
Mid-Game:
Be the relief for your teammates with cover but try to stay out of direct melee combat unless you're helping to ensure kills or you've won a teamfight and are cleaning up the enemy.
Keep and eye out for enemy LB's or general heavy damage. You'll need to use your own LB shortly before to ensure your allies are best protected.
Don't be scared to push the crystal outside of teamfights or engage to ensure kills. Your damage is low but your utility is still needed to win.
End-Game:
You're not safe until you've won.
In a winning fight, stick around and Shield Bash enemies coming out of guard. Try to find time to leave & Elixir when low just in case
In a losing fight, stay back and follow the Guardian Angel playstyle. Do not engage for too long if at all possible as your LB is often what wins an overtime game
Advanced
General:
A well timed Holy Sheltron can be used to save you from some LB’s such as Samurai
Use charge/intervene for extra damage between attacks during post-teamfight cleanup
Use Confiteor before your LB's blade combo on your target for extra damage
Cover/Guardian:
Distance yourself from your cover target so that you can break off as soon as possible
Guardian is tethered by distance & is unaffected LOS, you can wrap around pillars in Guard for a little extra safety.
Holy Sheltron just before guard ends if you're going to take damage
Don't feel pressured to cover immediately after your LB if your team isn't in immediate danger.
While Guard is usually required with cover, it's not always necessary with situations such as saving a low hp ally in your backline from a pursuing ninja being more than manageable with a Holy Sheltron in most cases.
How to Counter
Target the Paladin first and force them to Guard, this prevents them from Covering until Guard or LB is ready
Once a Paladin has used their cover they are extremely vulnerable & should be focused as the target priority.
AOE deals significantly more damage to a paladin when they're next to their cover target.
Roots, binds & silences prevent paladins from covering targets.
Monk, Reaper & Ninja LB's are a significant threat to their cover.
Regardless of Cover or Guard Status:
Chase down Paladins that attempt to escape the team fight where possible.
A paladin that cannot escape a team fight will never be able to safely utilize their kit.
Author: Anonymous Saint
Warrior

Pros
Lorem Ipsum
Cons
Lorem Ipsum
Playstyle(s):
Team Fight Focused:
Lorem Ipsum
Rat Focused:
Lorem Ipsum
Basics
General:
Lorem Ipsum
Opener:
Lorem Ipsum
Mid-Game:
Lorem Ipsum
End-Game:
Lorem Ipsum
__Advanced __
General:
Lorem Ipsum
Opener:
Lorem Ipsum
Mid-Game:
Lorem Ipsum
End-Game:
Lorem Ipsum
How to Counter
Hit em hard
Hitem Fast
Lorem ipsum
Author: Credit Where It's Due

Dark Knight

Pros
Lorem Ipsum
Cons
Lorem Ipsum
Playstyle(s):
Team Fight Focused:
Lorem Ipsum
Rat Focused:
Lorem Ipsum
Basics
General:
Lorem Ipsum
Opener:
Lorem Ipsum
Mid-Game:
Lorem Ipsum
End-Game:
Lorem Ipsum
Advanced
General:
Lorem Ipsum
Opener:
Lorem Ipsum
Mid-Game:
Lorem Ipsum
End-Game:
Lorem Ipsum
How to Counter
Hit em hard
Hitem Fast
Lorem ipsum
Author: Credit Where It's Due

Gunbreaker

Pros
The core mechanic, Draw and Junction, allows the GNB to react to the situation by changing between a focus on tanking, dps, or assisting with team healing
DPS can out-dps actual DPS jobs frequently
Incredibly strong in casual and lower rankings
One of the fastest-generating LBs
Cons
Junction entirely dependent on enemy team comp, no tanks means you can’t be a tank
LB very simple to avoid or be shut down by alert enemies
Can be quite squishy when not in tank junction
High skill floor to be used well
No cc outside of LB
Playstyle(s):
Push that Crystal:
If GNB can get Tank junction it has the strongest and longest mitigation of any tank
This mitigation also does damage back to opponents who hit the GNB, which can often add up in ways attackers don’t consider
It can also get a +20% to healing equating to the impact of an extra recuperate
If Tank isn’t available Healing junction can provide decent survivability
Healing junction provides low but steady healing to teammates around you which adds up in a long team fight on the crystal
GNB LB hits an area about the size of the crystal’s circle so it can create excellent zoning forcing enemies to retreat or die
No Survivors:
GNB’s high burst and survivability when not being the sole focus of an enemy team makes it excellent at chasing and finishing low enemies
GNB can exert a lot of pressure that keeps the enemy team from reorganizing or elixiring to return to the fight
If the GNB isn’t absolutely needed on the crystal this can be quite an effective strategy
Ability Overview:
Draw and Junction:
As mentioned GNB revolves around its ability Draw and Junction (Junction) which has a 25-yalm range and changes depending on the role of the enemy you use it on, Tank, Healer, or DPS, which does 3 things:
Change your “Junctioned Cast” ability into one of three abilities (all are off GCD (oGCD):
Tank: Nebula: Reduces damage taken by 20% and delivers an attack with a potency of 4,000 every time you suffer damage. Duration: 10s.
DPS: Blasting Zone: Delivers an attack with a potency of 10,000.
Healer: Aurora: Restores own or target party member's HP. Cure Potency: 12,000. Additional Effect: Regen. Cure Potency: 3,000. Duration: 12s.
Junction has a 20-second CD, the Junction Casts all share a 20-second CD, you can use a Junction Cast and then swap to another junction while maintaining the buff if you used Nebula or Aurora
Your Gnashing Fang combo will activate your Continuation combo as an oGCD that can follow-up with the main ability:
Each of these Continuation abilities have a bonus effect that depends on the role you have junctioned: Tank will generate shields for yourself, DPS will cause it to hit harder, and Healer will heal yourself and those around you
The Gnashing Fang combo all use the same hotbar button as Gnashing Fang, and hit for 5->6->7k regardless of your Junction
The Continuation abilities all use the same hotbar button as Continuation and hit baseline 1-2-3k and are oGCD meaning you can immediately follow Gnashing Fang combo with its corresponding Continuation.
Continuation effects are as follows:
Tank: base potency damage, generates a 4-> 5-> 6k shield for self
DPS: raises base potency damage to 3-> 4-> 5k (this raises the combo’s overall damage to 8-> 10-> 12k which is very good base damage)
Healer: base potency damage, heals for 2-> 3-> 4k in a 15-yalm radius
Grant Burst Strike in place of your basic weapon combo, and effect its continuation Hypervelocity
Burst Strike hits for 7k and can be used for 10 seconds after using Junction on any role or if you complete all three strikes of your basic combo
Hypervelocity hits for 3k baseline and like the other Continuations Tank Junction grants 6k shield, DPS Junction raises potency to 5k, Healer Junction heals 4k, all oGCD to follow-up the burst strike
Don’t drop Burst Strikes! The buff only lasts for 10s so it should be prioritized over the Gnashing Fang combo.
With all that said, you primarily want to be using your Gnashing Fang combo and your Continuations for their effects and superior damage.
If you use your basic weapon combo in between your Gnashing Fang combo it will cause it to reset and waste it
Using Burst Strike and Hypervelocity will not interrupt your combo
Your Gnashing Fang combo has a 15-second cd, each step of the combo gives you a 5s buff that lets you use its respective Continuation oGCD, if you fail to do this it will drop off. The Gnashing Fang combo has its own 30s combo timer. Only your basic auto-combo will break your Gnashing Fang combo.
On a dummy you can quickly work through the combo but in practice with targets moving, GCDs going to Recuperates, Double Downs, etc. you’ll rarely work through the Gnashing Fang combo so quickly you’ll have time to fill with the basic combo basic attacks
Do not let your Gnashing Fang combo drop to the best of your ability!
Double Down:
Double down does a 12k AoE underneath the GNB, it has no correlation to your target’s location
Make sure you’re actually on top of your target or within a step of them when you use it as it’s a 5-yalm radius, same as your LB’s radius.
Rough Divide:
Rushes to the target, hits for 2k, and grants a buff (No Mercy) that increases damage dealt and healing you do by 20% and increases your movement speed by 25%, it’s a 7-second buff with 2 charges and a 15 second CD.
Each No Mercy lasts ~3 GCDs. To maximize value, don’t overwrite No Mercy early
Skill priority for No Mercy is approximately as follows:
Relentless Rush = Terminal Trigger > Double Down > Blasting Zone > ALL Continuations > Burst Strike = Wicked Talon > Savage Claw > Gnashing Fang >>>>>>>>>> Auto-combo
Nebula’s DPS output can also benefit from the No Mercy buff, but that’s contingent on you taking damage during it.
Whenever possible, you should try to heal (Recuperate/Aurora) within NM windows to improve your MP economy and survivability.
If you’re out of Rough Divide charges, consider holding LB/DD/BZ until you have one again. (though ideally, you should be holding a charge of Rough Divide for an imminent LB instead.)
In order to maintain uptime on a fleeing target without overwriting NM, you should position yourself in advance to be ahead of where they’re trying to go.
Limit Break: Relentless Rush and Terminal Trigger
Relentless Rush charges in 60 seconds.
You spin like a beyblade for 4 seconds, dealing 4k potency and applying a 4% stacking vulnerability up and a 4% stacking damage down on anyone hit. You take 25% less damage during this.
Terminal Trigger: This can be activated one second after you use Relentless Rush to trigger it early or it will automatically occur at the end of your spinning after 4 seconds. It deals 12k damage around you and stun targets for 3 seconds.
Most of the value of your LB comes from the damage and stun in Terminal Trigger, so 99% of the time, you should hit TT ASAP.
WHEN IN DOUBT, TERMINAL TRIGGER.
Advanced
If you’ve made it through Abilities then you should understand by now that there’s a lot going on with GNB. Most of it will boil down to the situation you’re in and what the enemy team comp will allow you to do. There is no Basics section to this guide because GNB really only starts at Advanced play levels.
Opening:
If you’re the only tank on your team, you want to prioritize survival in the opener as you’re the likely kill target:
If the enemy team has a tank, get yourself Tank Junction
You can either use Nebula on engage, or engage, guard, and then use Nebula after the enemies have hopefully wasted burst into your guard
(the second is safer)As a tank you’ll want to follow the typical Tank opening strategy of absorbing as much enemy burst as you can without dying, and running away to Elixir as you run out of mana.
Exceptions, of course, if your team is slaughtering the enemies to the point you don’t need to retreat.
Alternatively (by choice or because the enemy has no tanks)
You can take DPS junction in the opening and use your near-instant ~26k burst (RD>DD>BZ) to get a quick pick on the first vulnerable target.
Just be wary of counter-burst by the enemy team.
The more tanks/melees you have frontlining with you, the safer this opener becomes.
After the Opening:
Whether you hug the crystal as the pillar of your team or dive to stop elixirs and finish off enemies will depend on the match’s flow.
After the opening, if you’re not being harassed, switching to DPS junction may be the move, but be careful as the enemies might swap to burst you.
In a match where you’re hugging the crystal you may spend more time in Nebula than not.
Generally speaking, you either want to absorb the enemy’s resources in an even fight, or snowball off positive tempo with DPS junction. Generally, Tank Junction is preferable in neutral and disadvantaged fights, DPS Junction is preferable in advantagious fight advantage, and healer junction is useful only when fighting into AOE bleed/MP burn (like SCH) or against an enemy that is trickle-stalling near their spawn.
Tank Junction is preferable in neutral and disadvantaged fights
DPS Junction is preferable in advantageous fights
Healer Junction is useful only when fighting into AOE bleed/MP burn (like SCH) or against an enemy that is trickle-stalling near their spawn
Limit Break
Executing LB:
GNB is incredibly fun at low ranks because people simply don’t defend against its LB and position on top of one another. You can easily score double, triples, and quad kills. This becomes much harder at higher matchmaking levels where enemies are more alert. To best use your LB you need to consider the following:
How many enemies have Guard?
(Starting it on a Guarding enemy right before it finishes is not a bad idea if they can’t escape)Are there un-purifiable ccs that might ruin your LB like WHM’s Miracle of Nature or Monk’s Enlightenment
Do you have Double Down up, Rough Divide, and ideally DPS Junction’s Blasting Zone?
Doing it Right
Ideally to make sure you get your LB off you cant to have someone cc you, then use Purify and launch into your LB
If you’ve just purged a cc with purify you get 5 seconds of immunity where only knockbacks, draw-ins, Miracle of Nature, DNC and RPR LBs can affect you
Alternatively, if you have a melee engage partner, you can have them soak the cc for you and then dive in and RR/TT after the enemy has burned those resources.
After this, activate Terminal Trigger ASAP (It will always inflict 2 stacks minimum.)
Your LB’s greatest use is the 12k damage + 3-second stun, not the vulnerability debuff
After executing Terminal Trigger you want to use Double Down and Blasting Zone if you have it
Do this and you’ll have AoE’d those around you for at least 24k, and hit one target for 34k. This rises to 28.4k with Rough Divide, and 40.4k for the single target
Alternatively
If you expect to be focused during your LB, you can pre-pop Nebula
Combined, RR and Nebula will give you 40% mitigation, plus the additional mitigation from inflicted Shrapnel stacks
While it’s always ideal to use your LB to burst and kill, it also has considerable stalling power if channeled for its full duration
This LB sounds great for trying for multi-kills but you shouldn’t hesitate to do this to single targets either. Since the LB is one of the shortest and can almost guarantee a kill if executed right, you can get your team that first kill which can then trigger a snowball to victory.
A Note About Being cc’d While LBing
Even if you’re hit with something like Meteodive or Miracle of Nature that causes complete loss of control, your LB will continue. If you can’t activate the trigger yourself, it will activate for you at the end no matter what. This can look a little janky because you might not see your character doing the animation, but know that you are doing the LB and should still position on top of an enemy if you can.(It’s worth noting that the 1s GCD delay is not present when RR times out and TT activates automatically, allowing you to DD marginally faster. It’s not worth channeling RR for this, but it’s still good to know.)
How to Counter
A problem for Gunbreaker is that there’s a fair amount of counterplay that can reduce its effectiveness.
Cc them when they’re LBing to prevent them from being able to execute Terminal Trigger early
Knockbacks are particularly effective since even purify doesn’t stop knockback effects
Spread out so they can’t cleave multiple people with their LB and double down
If the GNB telegraphs an impending LB by diving at you with LB active, hit sprint and just run, you can escape the AoE before it goes off. You can bind the GNB to help escape.
Generally speaking, all cc is always a problem for GNB, since it gets so much value from uptime.
Outside of LB GNB is usually fairly susceptible to cc and kiting, forcing them to burn their Rough Divide charges can reduce their survivability and threat potential. Watch for Nebula though and simply hit someone else during this time if your team is smart.Lastly, if you have no tank on your team, then you know the GNB has no real mitigation and is just a high-HP DPS. In this case I suggest killing them first since they’ll be both up in your face as a melee, but also because if left alone for a full minute their LB might win them the team fight if it’s still going.
Author: Verre Bellareve - Mateus
Contributor: Anonymous, Very Awesome Person #1

White Mage

Pros
A veritable swiss army knife of a job. Has the ability to contribute in nearly every situation.
Afflatus Purgation is one of, if not the best Limit Break in the game.
Miracle of Nature is the best single-target CC in the game outside of Limit Breaks.
Has the rare ability to purify teammates with Aquaveil.
Considerable survivability for its role..
Respectable burst and healing output.
Deaths are generally not as punishing as other jobs.
Very accessible skill floor, easy to pick up.
Cons
Is a high value target. Need to be prepared to draw a lot of fire, especially considering how close to the front you often find yourself in.
Like the other healers, still relatively team-dependent.
Your high leverage tools are susceptible to whiffing. Poor usage of your toolkit can throw games on the spot.
Ultimately a top-heavy toolkit. Can struggle to contribute when the tank is empty.
Playstyle(s):
Hit, Run, Heal, Repeat:
White Mage is at its best during teamfights, and getting the most value out of its considerable AoE and burst on both its offensive and defensive abilities.
Miracle of Nature by itself can give your team the upper hand during any square ups, such as the opening fight. Use it to initiate, getting the jump on the enemy with its instant cast, or to secure kills by pinning them down after they use Purify.
Outside of MoN or LB considerations, your play will boil down to a basic rotation of using your burst combo, repositioning while using instant-casts as necessary, delivering heals as needed, and spamming Glare/popping Elixir from a safe distance while waiting for cool-downs.
When it's all said and done, your biggest asset is your versatility and flexibility. There isn’t a specific order to the aforementioned rotation, and switching gears to meet the demands at hand is the core of White Mage play.
Basics:
General/Rules of Thumb:
Effective use of MoN and LB + Keeping people alive > everything else
Make the most out of your AoE
It’s better to keep something on CD instead of holding for optimal uses that may never come(within reason)
Opening Fight:
Save MoN and your burst combo for the kill target.
Use Cure III, Aquaveil and Afflatus Misery to assist with movement if needed.
Counter enemy aggression with healing. Keep an eye out for any disabled allies to purify with Aquaveil. Cure III grouped teammates for value or combo with Aquaveil for formidable burst healing.
As the fight slows down, start setting up for your first LB.
Mid-Game:
More than most others, your mid-game is defined by your LB.
The very first LB that you use is often the most important because the enemy team will rarely have any of their own to answer with. You will have to decide between using it aggressively to build or maintain momentum, or to hold it for a big teamfight.
Be prepared to run a lot. You want to be within reach of as many of your teammates as you can to answer their needs, despite any engagements that may happen to break out separately and away from each other. Exercise good map awareness and try to stay on top of everyone’s position.
End-Game:
If you’re playing with momentum/tempo, you want to be in the front and making the most out of your offensive kit trying to clean-up and stagger the enemy. Just make sure to read your team and push the crystal yourself if needed.
If you’re on the backfoot, prioritize keeping your teammates alive. Bolster your team with liberal Seraph Strike + Cure III usage until you and your team can put together a turnaround play.
Advanced/Toolkit Breakdown:
Afflatus Purgation (Limit Break):
Ultimately much of the same logic one would use for any major teamfight ability applies to your LB. Hit as many targets as you can, within range of your teammates' support. Stay on top of LB economy, and general game state, and understand which enemies are the biggest threats to your team.
In a teamfight, the earlier you can use it, the better, in order to get the most out of Temperance and Regen. Initiating with it is ideal.
Understand how much momentum your team is working with before you use your LB. If you are playing with an advantage, be aggressive, otherwise play around your team. Aggression is rewarded with more uses per game, but make sure you ask yourself and double check if your team will need your LB for the very next fight before using it for solo pickoff.
Plan your rotation ahead, and try to make sure you at least have at least Afflatus Misery and MoN, preferably with Seraph Strike, to combo if possible.
Depending on composition and strategy, Regen can be the more valuable half of your LB. If your team is struggling less with damage or execution, and more with sustain, focus more on using your LB as a support tool and providing Regen in a timely manner.
Use corners to your advantage to help lineup targets. Targeting enemies in their back-line can also help with accurately lining up your LB.
Miracle of Nature:
As mentioned above, MoN’s optimal use is to pin down targets who have just used Purify, securing kills that otherwise would have gotten away.
Use MoN defensively by getting the jump on enemies initiating. Help out teammates retreating and disable enemies attempting to clean-up, possibly even setting up for a turnaround.
With a deft hand and mind you can ‘ghost’ enemy abilities that have a delay between when they’re activated, and when they snapshot. Particularly LBs, for example Samurai and Reaper.
Be mindful of the instant-cast, as well as mechanics such as spell-queuing. Once you press that button you’ve committed to using it, even mid-animation, and can end up whiffing if your target uses Guard during your animations.
Seraph Strike + Cure III:
Seraph Strike is the backbone of your kit, and prints value. During fights it should be used as much as possible.
Use Cure III to burst heal whoever is getting focused, AoE heal a dog pile, and to help reposition while keeping uptime.
Pair Cure III with Aquaveil to bailout someone getting focused. Precast Cure II if you have a read on the enemy to really pump heals.
Seraph Striking into a Cure III is faster than casting Cure II.
As with other gap closers, can ‘phase’ through corners with correct positioning.
Afflatus Misery:
As with most things, it is better to use it on CD for uptime than to hold on to it excessively. If you’re playing a slower game with less aggression, use it to harass and chip away enemies.
Make the most of its instant-cast to weave and reposition.
When bursting a target it is better to Misery first into Seraph Strike.
Aquaveil:
Use liberally against teams with less CC, against CC heavy teams you should try to be more selective. Ideally it is best used before Purify, but you can’t count on that especially in SoloQ/uncoordinated environments.
Over the long-term, it’s still better to use it as much as you can when people are taking damage. Plan ahead of time, and try to keep track of enemy CC usage for when you need to hold.
If you’re using it strictly for healing, prioritize using Aquaveil before other heals since it's both a barrier, as well as being instant.
Cure II:
While far from the strongest part of your kit, it is still immensely valuable as a source of in-combat healing outside of Recuperate.
The easiest use of Cure II is healing teammates under Guard.
Requiring a hard cast is both an advantage and disadvantage. While you will need to be proactive, and anticipate damage ahead of time, you can also cancel and switch to a target in more need without wasting a charge.
Don’t forget about slidecasting, and the open oGCD window.
Glare:
Don’t forget about slidecasting, and the open oGCD window. Always be casting until your last breath, because you’ve still got Glare.
Dying:
While it is never good to die, it is preferable for a White Mage to die before others given the circumstance.
The main consideration here is WHM’s top heavy kit. You can spend all of your primary abilities in 2 GCDs, dump your Cure IIs, and then spend the next 10-15s spamming Glare, waiting for cooldowns. In this case, if someone on your team has to die, you’re probably the best fit.
On the contrary, WHM is the last person who should die if their high-leverage tools are ready and available.
Understanding and exploiting what risks and rewards are available is the name of any game at any sort of high-level play, and for WHM a large part of this is when and where you die. At the very least make sure to empty the tank before you die.
How to Counter
WHM is still dependent on working with their team to obtain results, and doesn’t want to get singled out.
Falls short playing against tanky, high sustain compositions who can shrug off WHM’s burst.
Lacks a quality escape, will die easily if caught unprepared and out of position.
Author: Him

Scholar

Pros
Moderate-High passive damage output with Biolysis.
Decent shielding and healing through Adloquium and Consolation.
Useful/Decent teamwide damage buff through Adloquium’s second effect.
Built in Fetter Ward and game changing Limit Break: Summon Seraph
Amazing healing reduction through Mummification.
Cons
Very team reliant; can’t really carry its own weight.
Gets LOS’d often, resulting in missed or partial use of Deployment Tactics, (Both for Adloquium and Biolysis spreading).
Requires frequent/near perfect uptime to truly shine in teamfights and throughout a match in general. One or more deaths can be highly detrimental.
Lacks any meaningful burst compared to the other 3 healers.
Introduction
Hey everyone! My name is Lelouch Masamune, and this will be my best attempt at writing an in depth guide to playing Scholar in Crystaline Conflict, (and across all PvP modes). I’m a Multi Top 100 player in the Crystal Data Center, where I placed Top 30 in 2 consecutive seasons as a Scholar/Summoner main. In this guide, I will teach you everything I know about Scholar after having roughly 300-400 hours of play time with the job. So sit back, get comfy, and get your pen and paper ready!
Playstyle(s):
Running For Your Life:
SCH has no true escape abilities, meaning your only defensives are the universal ones, purify, guard, and recuperate
(Because Expedient is kept nearly on CD to maximize damage I don't consider it much of a defensive)Enemies will keep an eye on your usage of these, especially purify and guard, so you want to avoid using them prematurely
Your best defense is positioning safely away from the AoE cleave of team fights
Your second-best defensive is utilizing sprint to run away and abuse LoS to frustrate attempts to target or hit you
Holding Down the Crystal:
The opposite of the other playstyle, this is what you should do when your team has the advantage
When the tempo is to your team's advantage, you should hold the crystal so that they can press on
This also might be something you have to do to prevent the crystal from moving past your team's % before OT if doing so is worth the risk
When SCH LB is active the SCH themselves can tank a significant amount of damage with proper experience
Ability Breakdowns


Adloquium
8% Damage up buff on target
4k heal + 4k shield
4000 Heal + 6000 Shield With Recitation Active
15 Second Duration/CD, 2 stacks
Biolysis
8% Damage down on target
3k Damage DoT that ticks 5 times for 15k total per target (base)
75,000 damage total if spread on all 5 enemies4.5k tick for 22500 total with Recitation buff
112,500 damage total if spread on all 5 enemies4860 tick for 24300 total with Recitation + Adloquium active
121,500 damage total if spread on all 5 enemies15 Second Duration/CD, 1 stack
Deployment Tactics
Spread the effect of Adloquium or Biolysis within 15y of the target
30y range
2 casts
Does nothing if neither buff or debuff is on the target wasting it
Expedient
Grants Self and Teammates:
1. 25% movement speed for 10 seconds
2. 10% Incoming damage reduction for 10 secondsGrants Recitaiton to the Scholar for 15 seconds
- This increases the next Adlo shield or Bioloysis damage by 50%
Mummification
6k Damage in a frontal cone
Reduces target healing by 25% (15k recupe becomes 11,250)
10 Second duration
Broil IV
5k Damage single target cast
Your filler when you have nothing else to cast
Limit Break


Summon Seraph
Summons Seraph for 20 seconds on the large targeted area
This does three things:
Seraph Flight (Cast on Allies in Target Area)
Nullifies the next status affliction that can be removed by Purify
20-second duration
Excogitation (Cast on Allies in Target Area)
Heals 8k when target falls below 50% or ability expires
20-second duration
Recitation (SCH Self-Buff)
Same as Recitation buff above
Does not stack
Make sure you don't have an existing Recitation buff before LBing
Seraphic Veil
While Seraph is active it will cast this, healing for 4k and providing a 4k shield
You cannot control this
30y range
Consolation
4k Heal 4k shield 20y range
You can trigger this while Seraph is active
Basic Rotation + Combos
So now that we know what the buttons do, how do we put them all together in a meaningful rotation? The standard rotation that you should aim to maintain throughout an entire match of Crystaline Conflict is as follows:

And so on and so forth…The idea is to try and maintain Adloquium barrier + buff for as long as possible given that an 8% damage increase, (while negligible) can be the difference between securing a kill or letting the enemy live. Also Expedient with Biolysis is probably the only optimal application of the Recitation buff granted by Expedient, since an increased shield from Recitation buff just doesn’t scale in comparison to the 1.5-1.8k more damage that Biolysis can deal per tick.Now you don’t always have to follow this rotation exactly as it’s shown. In some cases this rotation won’t always be the most optimal since you may have a team comp that requires more frequent use of Adloquium + Deployment Tactics near the 3rd Deployment Tactics spread (i.e. team of only damage dealers, no tanks, you’re the only healer, etc.) or a team that requires more damage to secure kills with Biolysis + Deployment Tactics, (i.e. team of 3 healers 1 tank 1 DPS, 2 tanks like PLD, DRK, and any other 2 members that have low damage output, etc.) you get the picture. Use your best judgment as to what needs to be prioritized more based on the team comp; but as a general rule of thumb, the aforementioned rotation in the diagram should be the best.Now for some basic combos:
Combo 1

This combo will essentially be how you secure a kill. With perfect uptime and assuming the target has no form of mitigation or guard present, you will deal a total of 51,300 damage on the target throughout Biolysis’ entire duration. This is essentially an entire health pool of a DPS or Healer, so make sure to land as many broils as you can on a target that has the full duration of Biolysis!
Combo 2

Short and to the point, this combo essentially is Scholar’s burst. Opening with Adloquium’s damage buff, you can Broil + Mummify for a quick GCD + oGCD combo that allows you to deal 11,880 damage in 3 buttons, while making the target have healing reduction.
Combo 3

This combo is a game changer. If executed perfectly, this combo not only gives your team all the properties and buffs that come along with Summon Seraph, but you also do what combo 2 does, but now with a free Recitation buff from Summon Seraph. Essentially combo 1 & combo 2 combined.
Do's and Don'ts
This section of the guide will be a quick summary of, (as the chapter name implies), the Do’s and Dont’s of Scholar.
Do
Always, always, always, use Expedient whenever it comes off CD, even if teammates aren’t nearby. Sometimes the sacrifice/trade-off in not giving your teammates a speed boost and damage reduction can come in the form of dealing more damage with Biolysis. This has to be considered with good judgment; use it wisely, but frequently.
Do try to keep Adloquium up on your teammates as long as possible. You get two charges for a reason: 1 to cast on self to then spread with DT, and a second one to get those that may have not been in range for Deployment Tactics, or when DT is on CD. Remember that Scholar’s Adloquium buff can be the difference between securing a kill, or letting an enemy live by 4-5k. You’re essentially, (and potentially) a permanent The Balance buff from AST. Consider and gauge the situation wisely and ask yourself: “Do my teammates need more damage to push checkpoint from Adloquium, or do they need more damage from an Expedient + Biolysis at the cost of a Deployment Tactics?”
Use Mummification as often and as frequently as possible. While it can be a bit dangerous and risky to get yourself in melee range of most enemies, the trade-off can be moderate to almost game changing if done properly. Also, consider using it on 2 or more enemies, rather than just 1 singular enemy, (unless that enemy happens to be a super low HP target with hardly any MP to get a heal in, for kill securing’s sake). Again, use best judgment.
Don't
EVER USE BIOLYSIS WITHOUT EXPEDIENT BUFF!!! I can’t stress this enough, but seriously don’t try it. You’ve essentially wasted what could have been free 10,000 extra damage. Not only that, but the math comes out to a mere 15,000 damage un-buffed by either Adloquium or Expedient, which means that the damage dealt would have been healed back by the time the duration of Biolysis is over by the MP regen of the target. TL;DR DONT USE BIOLYSIS EVER WITHOUT RECITATION BUFF.
EXPEDIENT THEN SUMMON SERAPH EVER! This was stated earlier in the guide, but here I’ll emphasize it more. If you use Expedient, make sure to make use of the Recitation buff on either an Adloquium or Biolysis, THEN Summon Seraph. Otherwise, you waste a Recitation buff; they don’t stack!
DO NOT JUST USE ADLOQUIUM OR BIOLYSIS ONLY, use Broil IV whenever you get the chance. Kind of common sense, and pretty self explanatory. 5000-5400 damage is small, but adds up over time!
Useful Macros
This guide wouldn’t be complete without macros, so I thought I’d include the macros that I find the most useful and beneficial. Scholar is a job that feels kind of barebones without them, so below you will find the macros I use when playing. Try and find at least 8-10 Hotbar spaces to fit them. The format will be lines of code/macro code in between two bars with a title/macro name before the first bar as follows:
Cast Adloquium on Party Members
/merror off
/pvpac "Adloquium" <1>
/micon "Adloquium" pvpactionReplace <1> with 2-5 to have a macro auto-targeting each possible team member on your bars
Summon Seraph on Target, No Need to Aim LB
/merror off
/pvpac "Summon Seraph" <t>
/micon "Summon Seraph" pvpaction
Summon Seraph on Self, No Need to Aim LB
/merror off
/pvpaction "Summon Seraph"<me>
/micon "Summon Seraph"pvpaction
Adloquium + Deployment Tactics Spread in 1 Button
/merror off
/pvpaction "Adloquium"
/wait
/pvpaction "Deployment Tactics" <me>
/micon "Adloquium" pvpaction
Biolysis + Deployment Tactics Spread in 1 Button
/merror off
/pvpaction "Biolysis"
/wait
/pvpaction "Deployment Tactics"
/micon "Biolysis" pvpactionSmall note: Use this sparingly; try and train yourself to Biolysis + DT separately, since this macro breaks the minute you aren’t targeting your target, (if that makes sense).
Broil IV + Mummification While Broil is on CD, and if Target is in Range for Mummification
/merror off
/pvpaction "Broil IV"
/pvpaction "Mummification"
/micon "Broil IV" pvpaction
Conclusion + Additional Resources
And with that said, that should be everything that there is to Scholar in PvP. I hope that this guide is useful and helps you on your journey to mastering Scholar. It is by no means an easy task; Scholar definitely falls into the category of easy to learn, but hard to master. It can seem like a pretty mediocre job at first, but once you learn how to utilize all of Scholar’s tools to the best of your ability, you will eventually see results. I wish you the best of luck with your matches!If at any point you would like to contact me, you can add me on Discord at SuspensionXD#1597. I will be making a visual/youtube version of this guide in the near future when I have some free time, so be on the lookout for that as well! Links to my Youtube, Twitter, and Twitch can be found below:Twitter: Lelouch Masamune (@TheRealLelouchM)
Youtube: Lelouch Masamune - YouTube
Twitch: SuspenshunXD - Twitch
Author: Lelouch Masamune - Malboro

Astrologian

Pros
Lorem Ipsum
Cons
Lorem Ipsum
Sage

Pros
Lorem Ipsum
Cons
Lorem Ipsum
Monk

Pros
Lorem Ipsum
Cons
Lorem Ipsum
Dragoon

Pros
Extremely mobile melee DPS
Strong burst window with 15y range
Highest damage abilities have built-in cleave
Punishing high damage LB with conditional invulnerability and a 25k eHP shield
Cons
Possess no crowd control whatsoever, relies on teammates to help lock down kill targets
Vulnerable during burst window due to Life of the Dragon
Thrives at range, suffers if forced to frontline for too long
Burst window and LB is highly telegraphed and predictable
LB is hard-countered if enemies use Guard after Sky High
Lacks damage outside of burst window
Playstyle:
Team Fight Focused:
DRG is best played as the team’s primary dps, participating in engagements on the crystal or large group fights where it can exploit its high damage cleave for maximum gain. Its high 1 GCD burst with Geirskogul + WWT + Nastrond, paired with team burst and crowd control is enough to kill unaware targets and punish others that are vulnerable or out of position. Furthermore, Sky Shatter becomes much more lethal when paired with other LBs and crowd control from teammates.
As a priority target for the enemy team due to Life of the Dragon and its high damage, it is prudent to stay in your backline while preparing your burst and before engagements begin– DRG suffers if it cannot execute burst safely, or when forced to be the first one in.
In addition, its high burst and mobility with High Jump and Elusive Jump allows DRG to act as an assassin for weak targets trying to escape at low HP and MP. Both jumps can be used to catch up to targets and steal medkits on the ground to deny them healing while you secure the kill. Only do this if you know you can guarantee the kill– you do not have crowd control to lock a target down; accept that some targets will get away and return to help win the team fight while they elixir.
In short, play back, play safe, and play to cleave.
Basics
General:
Elusive Jump is a 15y backflip that cleanses Bind, Heavy, and gives a speed boost in addition to turning into Wyrmwind Thrust (aka WWT). WWT does more damage the further the target is, up to a maximum of 16k when the target is 15 yalms away. Always try to use WWT at its max distance whilst cleaving as many enemies as possible.
Geirskogul grants Life of the Dragon (aka Life) for 10 seconds, increasing damage dealt AND taken by 25% for the duration. Life can be dispelled early by using Nastrond, which Geirskogul turns into.
Fit your highest damage abilities such as Heavens Thrust and WWT under Life of the Dragon.
You are always a priority target when entering Life; keep your burst window short (1-2 GCDs) and end the buff quickly with Nastrond in order to reduce the amount of damage taken.
Geirskogul and Elusive Jump both have a 20s cooldown; every Life window should include at least 1 WWT.
Geirskogul, Wyrmwind Thrust, and Nastrond are all cleaves with a range of 15y or more; avoid entering Life in point blank melee range and line yourself up to cleave as many targets as possible in addition to your primary one.
Horrid Roar is a 10y self-centered AoE, and all targets you hit with it deal 50% less damage to you for 10s. Try to hit as many targets as possible with Horrid Roar, especially enemy ranged and DPS, and pair it with when you are entering Life and bursting.
Sky High/Shatter, your limit break, inherits buff effects such as Life of the Dragon and Elusive Jump’s speed boost (and other teammate buffs). Every use of Sky High should at least be under the effect of Life; it turns into a large 40k damage AoE when unmitigated.
You will automatically land with Sky Shatter 5s after using the limit break; pressing Sky Shatter after entering Sky High allows you to land early. There is a ~2s delay between being able to press Sky High and landing immediately.
You are __conditionally__ invulnerable during the effect of Sky High; you are untargetable, but delayed abilities and damage over time effects will continue to tick on your health. Don’t attempt to LB at low HP; you’ll likely die midair and lose the use.
Sky Shatter is easily countered if enemies have Guard and see your reticle approaching them; use it only if you’re confident they are not aware of your LB, do not have Guard, or are being stunned/debuffed by other teammates.
Advanced
This portion of the guide discusses the class and gameplay in a more technical and detailed perspective beyond what you might see necessary for casual play. Nonetheless, most of these details are relevant to being a competent player on the job in high ranked lobbies.
Positioning:
The nature of the job (dmg taken from Life, priority target, WWT damage based on distance) encourages DRG to be played and positioned like a ranged DPS.
When you’re not bursting or preparing to burst, play at a distance– hover near your team’s backline, and try to keep yourself near walls for easy cover. Good players will have CC ready if you go into Life right in front of them or in an easy to reach position, and DRG is a common target for opening burst in extremely high level games.
While you are bursting, adjust in a way that lets you cleave as many targets as possible. Even though you might have a primary target in mind, anyone you hit as collateral is still likely going to use recuperates and burn their MP even if the team doesn’t CC them. Low MP players become solid targets, and the more enemies that are elixiring give you opportunities to kill their teammates left on point.
Alignment, Life Window, Big GCDs:
Most of DRG’s core abilities have a cooldown of around 20s, and your goal is to ensure that you make the most out of that burst window with Elusive and Geirskogul on a 20s CD; especially since DRG’s filler outside of Life is incredibly weak.
While you should be prepping WWT by using Elusive 2-3s before you burst, avoid trying to use it upwards of 5-10s earlier and then using WWT seconds before the buff falls off. A decent goal is to fit at least WWT in every Life window, so you want to keep their cooldowns aligned as much as possible.
Life of the Dragon itself makes the burst window beyond WWT very flexible. If you’re being pressured or expect to be a target, your burst can be as short as 1 GCD:
(pre-Elusive > Geirskogul > WWT > Nastrond)
“Flashing” the Life buff for such a short time reduces the likelihood of you being stunned and bursted in the time it takes you to purify the debuff and use Nastrond.
On the other hand, if you aren’t being focused or taking too much damage, you can also extend the Life window to include more hard hitting GCDs, such as High Jump + Heavens Thrust or Chaotic Spring; getting an enemy below 50% for Nastrond’s extra damage does add up.
Trust your gut with Life– it is usually better to end early with Nastrond than late and die as a result if you realize the enemy is turning on you, or if more enemies show up while you’re hitting your target.
Try not to let Life expire on its own either, even if you’re wailing on a target with no HP and no enemies around to save them. Nastrond is a sizable portion of damage and does more damage if the target is below 50% HP.
There is an important note to be made with Chaotic Spring (aka Cspring)— when you’re on the defensive, it’s a decent play to flash Geirskogul just for your 1 GCD to be CSpring because of its substantial heal; 12k without Life and 15k under Life. It’s essentially 1 free Recuperate every 15s or so and can be the difference between life and death in tight engagements, and can be flexibly put in Life anyways for extra damage.
Not high on the list of things to be looking for, but the heal is nice enough that you want to avoid sending it on shielded targets and those in Guard. The heal is based on DMG dealt, so sending it into shields heals you for nothing.
Regardless of whether it goes in Life or not, High Jump should also be used around your 20s burst window when possible; it has a 10s CD and keeping it aligned means you can have HThrust to pair with your 20s burst and another one at 10s. (see Elixiring)
Since HThrust is a 10s buff granted by High Jump, which also shares a 10s CD, holding the buff to the last second allows you to do 2 HThrusts back to back, which can be a decent source of damage if you didn’t put the first HThrust into Life and your important buttons are still on cooldown.
Elixiring:
Since so much of DRG’s kit is used around the 20s burst with Life and it only contributes raw damage to team fights, DRG can often find itself with downtime inbetween the next Geirskogul. Its 123 combo filler is incredibly weak compared to its burst, and if you have nothing important to contribute outside of burst (ie: pushing point, using Roar to frontline and soak damage), __the best move can be to leave and elixir frequently__, not just when you’re near dead. Having full HP/MP for the next engagement makes you a harder target to kill and you won’t be missing out on a lot of damage anyways (barring the High Jump + HThrust you get at 10s).
Horrid Roar:
Due to the nature of latency in the game, Roar should be used preemptively like most defensive cooldowns, not when you’re being bursted. It takes a second for the button to go out and for enemy clients to register the debuff, and it probably won’t save you if you use it in the middle of being burst instead of before.
Good Roar usage lets DRG soak high amounts of damage while still being in a comfortable position to burst.
The more you understand about the game state and all the jobs, the more value you get out of Roar as a defensive CD. Being able to identify the biggest threats to you in a teamfight– the DPS, a WAR in Inner Release, or a DRK focusing you, and debuffing them instead of the healers or someone who does not have burst allows you to soak as much damage for your teammates as possible while still contributing your own.
Try to stagger Roar usage with Guard; 50% reduction may be enough to keep you alive and leaves Guard available for map mechanics (ie: samurai bots on Clocktown, turbulence on C9) or for another 5s of mit after Roar wears off.
You will rarely be able to Roar all 5 enemies without putting yourself in a bad position; ranged are often too far and can spread to avoid it. Be cognizant and abuse LoS on missed targets to make up for mitigation when possible.
The 50% reduction is also massive if you can identify and deny high burst/kill combos on yourself– examples include but not limited to MCH’s Wildfire + LB, MNK’s one-shot combo with Meteodrive, or an enemy DRG’s burst. Using Roar on just that one person mid-combo is the difference between eating 50k damage and dying, or baiting a wasted LB and walking away from it alive. While the intricacies of this are far too long to include in a guide on just DRG, common tells include debuffs on you or some enemy buffs.
Elusive Jump:
Aside from turning into WWT, Elusive being a target-less 15y backstep gives DRG an incredible amount of mobility. It can substitute as a gapcloser, and allows you to cleanse bind and heavy without wasting your purify.
If you backflip towards a corner, you will actually “snap” and teleport around the corner to the other side. It’s easier to do on maps like Clocktown or Palaistra without corner pillars (looking at you, VH), and easier compared to other gapclosers since you don’t require a target, and can allow you to break LoS very easily for getaways.
If you just want WWT without displacing yourself too much, you can also aim yourself into a close corner or a wall so you don’t move the full 15y.
Being able to comfortably and consistently aim Elusive Jump on whatever control scheme you use is important. I personally play on MnK and use LMB + RMB to face my character, but do what works for you.
Sky Shatter/LB Useage:
Like the rest of DRG’s kit, Sky Shatter is an incredibly potent AOE LB that can facilitate entire team wipes, but requires good judgment and the support of teammates to use in high level games. Beyond Platinum+ in ranked, people won’t let you LB in front of their face and eat the full damage; they will sprint to outrun you or Guard if they have it.
Looking for multi kills and LB targets– you don’t want to just LB into clumps of enemies, but aim for specific individuals who don’t have Guard and have no way to escape your LB. While the AOE is fantastic, high ranked games have fewer opportunities where you’ll ever get 5 man LBs on the enemy team, and being surgical with it allows the team to secure kills on priority targets.
Examples include enemies who just used Guard/are in Guard (lasts for 5s, you can stay in the air for 5s, so LBing anytime after Guard will work) and have no gapcloser or escape, enemies who are being stunlocked by your team with no Purify, and people stuck in LB animation lock.
Another high priority target worthy of its own listing are PLDs covering targets so they can elixir– if they are still in range of their cover target when Guard expires, Sky Shatter can one shot them if you land it on both the PLD and their cover target (40k x 2). Good paladins will be ready to break the tether as soon as their target elixirs, and can use Holy Sheltron to mitigate the hit to prevent OHKs, but Sky Shatter is still an excellent tool to punish poorly positioned covers and raw covers without Guard.
While in the air, you are conditionally untargetable and invulnerable to SOME map mechanics.
The keyword is conditionally– late snapshotting abilities and DoTs can still tick on you for full damage when you go into the air. Respect the enemy and avoid LBing at low HP, you’ll probably die and miss a use.
While in the air, you can contest the crystal and move it if no enemies are on it; desperate overtime situations may force you to use the full 5s of Sky Shatter as a pseudo-invuln to stall the crystal.
You are also immune to bombs on Volcanic Heart, turbulence on C9, and the samurai OHK robots on Clocktown.
You can enter Life, then actually use Sky Shatter from behind walls and terrain to hide your reticle and then come around the corner with the LB. Good players may spot it but hugging a wall covers most of the reticle and can catch players offguard who otherwise might have guarded it. Doing this also LOSes enemies so they can’t CC you in Life or catch you at low HP while you go up.
A list of common and versatile map interactions:
Volcanic Heart - each orb from the bomb explosions is +5% damage and 5s of LB gauge; the buff caps at 30%, but in addition to boosting your regular damage it makes Sky Shatter a near-OHK to bruised targets.
Cloud 9 - Tailfeather Boost from getting a turbulence feather is worth 30s of LB gauge and gives a MASSIVE speed boost that affects Sky Shatter– you can catch up to sprinting targets in LB with it, and start your LB from unexpected angles and distances.
Prepping Life before turbulence hits, then guarding the knock up and LBing right after lets you land on anyone who did not Guard turbulence or get a feather; the 35k hit on top of the 30k from turbulence is enough to OHK most jobs before they can recuperate.
Being in the air during Sky Shatter does make you immune to turbulence’s knock up, but you will land before everyone else does and hit no one with your LB; you must Guard then LB if you want to kill someone who ate the knock up.
Clocktown - Invulnerable to the samurai bot OHK AOE, directly landing on targets mini’d by the gaze bot is a 72k hit, coins give LB gauge.
Sky Shatter’s massive 24k eHP shield from landing can be used to bait SAM’s Zantetsuken sometimes; you recup to full HP and proc their Chiten with a low damage ability and live the Zantetsuken because of the shield. Keep a close eye on your own HP if you do this, and avoid baiting near teammates who also might have touched Chiten.
Bad LBs happen; you might’ve miscalculated or someone might have Guard when you didn’t expect them to. Make the most out of a bad situation and force out as many Guards as you can, at worst it zones enemies and gives the team a 30s window to kill a target who burned Guard for your LB.
LB Synergies:
Pairing Sky Shatter with other jobs and their LBs gives you a larger variety of viable LB targets and provides more opportunities for multi kills and teamwipes. Some are easy to execute while others may require precise timing and teammates to be on the same page. Common synergies include:
WAR - their Primal Scream LB disables Guard on all the targets they hit; unguarded targets without movement skills are easy hits for Sky Shatter. Enemy WARs cannot use Guard under the effect of the LB either, and Sky Shatter can be used to burn their massive 75k HP pool to set up a kill. 90s LB like Sky Shatter; can be synced together immediately if neither player dies in the first 90s of a match.
DRK - Salted Earth’s pull can bait out Guards and pull enemies together for a big Sky Shatter hit. Eventide is a 105s LB but can also be synced for damage at some point in the game.
DNC - Contradance is an AOE charm and guard break for up to 4s; obvious multikill potential. Also a 90s LB for timing purposes; riskier for the DNC to LB first since they have animation lock and are vulnerable. DRG can LB first or second in reaction to Contradance in this combo.
RPR - Tenebrae Lemurum is a 45s AOE guard break with a 2s uncleansable Hysteria; assuming neither player dies their second LB will line up with Sky Shatter around 90s. DRG MUST LB FIRST in this combo, then RPR fears targets out of Guard; DRG cannot reactively LB in response to RPR lb going out or Hysteria will wear off by the time you land.
SMN - Also a 90s high damage AOE LB; useful pairing by raw damage although targets can easily Guard both without extra crowd control.
AST - Celestial Tide LB is a potential 30% damage boost for Sky Shatter but sits on a 105s CD.
WHM - Afflatus Purgation’s stun can allow a Sky Shatter hit in the second it takes for stunned targets to Purify then Guard if synced well; otherwise still useful for damage sync in some cases.
Team Composition and Adjusting:
Ranked compositions are a coin toss and DRG has a massive responsibility to adjust to the strengths and weaknesses of a random composition. You may be the primary DPS for one game, and the damage sponge the next and these outlier comps demand unorthodox and patient play.
Solo melee - being solo melee with 4 ranged on your team means that you must play upfront and act as the tank with Roar. Your life windows may be short and limited to WWT or CSpring alone, and you might be forced to pot more frequently, but you trade your own DPS so your fragile ranged players have the space to back you up. Avoid chasing targets and leaving your team for too long.
Solo DPS - in comps with numerous tanks and healers and only one or two DPS, you must play for attrition and point control. Focus on staying alive and outliving enemy burst with the support of your healers, each death by you can cripple the team’s kill potential.
Patience is a virtue. If you’re uncertain on team or enemy comp, it’s best to play around the point with an attrition mindset. Accept that people will get away and elixir and take the opportunity to attack someone else instead while your team has a numbers advantage; taking fights with the team gives DRG the crowd control it needs and lets you cleave and burn more MP. Chasing and overextending on a target who’s clearly gotten away or taking ego 1v1s you know you won’t win is an easy way to get turned on and lose the game.
How to Counter
DRGs will melt if they are bursted under Life of the Dragon; they also visually glow red during the buff’s duration as an easy tell. CC and burst them during the buff when possible.
Like all melees, they are helpless if they reengage without Purify; they can be stunlocked and deleted in team fights easily if caught without it.
Spreading for Horrid Roar and their cleave abilities greatly reduces the strength of their mitigation and the value they get from burst windows; each person that isn’t hit by Horrid Roar doesn’t have to overcome a 50% damage down when they try to kill the DRG.
Likewise, bursting them during Roar downtime leaves them with few mitigation tools other than Guard or running.
DRGs do not possess crowd control or Guard break, and their burst windows are highly telegraphed (literally). You can run away and steal medkits to force them into bad positions to burst you, and without the support of their teammates, you can generally Guard Sky Shatter when you see the massive reticle to negate most of the damage.
Signs that a DRG is setting up burst include entering Life of the Dragon and backflipping to prep WWT.
If a DRG doesn’t have a speed boost from Elusive Jump or a C9 feather during LB, you can sprint away and outrun Sky Shatter entirely if you see the reticle approaching you from afar. It only does full damage within 5m of the center of the LB, so even if you’re forced to eat it without mitigation, make an effort to be on the outer edge of the blast radius.
Their highest damage ability, Wyrmwind Thrust, is tied to a backflip and only does the most damage when 15y away. If a DRG “preps” their backflip, you can line of sight them entirely as they enter their burst window to force them to pick another target or misposition, or use a gapcloser and remain in point blank range to minimize damage taken.
Since Elusive Jump is often reserved for dealing damage instead of cleansing Bind/Heavy or movement, you can generally trust that a DRG who has just used WWT cannot backflip away from you in the next ~10s.
Author: Setsuna Yuki - Goblin

Ninja

Pros
Solid melee with good ranged options; some say it’s more like a ranged class
Fast and easy-access burst.
Versatile toolkit
Possibly the strongest (and most notorious) LB
Effective in most situations
Cons
Although your ranged option is spammable, it can’t be used exclusively. Certain scenarios will force you into melee range
Burst is not the strongest
With versatility comes a price; you have to choose between high damage and high survivability
LB effectiveness is highly situational and team-based
NIN’s effectiveness in general is based on team skill and composition
Playstyle(s):
Hard DPS:
When NIN is the strongest DPS job on a team, you’ll be forced to play more offensively with heavy-hitting mudras
CC Hound:
Force enemies to burn purifies, steal potions in the front and backline, harass ranged, and create space for your teammates by baiting bursts and taking people off the crystal; this playstyle has a heavy focus on survivability
Versatile:
A combination of the two in moderation. This is how you should play in premade parties in order to utilize all of NIN’s capabilities to the fullest. You can chase, focus on hard DPS, burn purifies, and even cc targets when you know your teammates are down a purify
Basics
General Knowledge:
NIN specifically requires a good grasp of fundamentals in order to function properly.
These include knowing who the burst target currently is, knowing the crystal’s position, which enemy just used guard or purify, where those enemies are, your own position in relation to them, and how to play the current map.
Start your opener 3 seconds before the gate opens: start with Bunshin or Mudra. If you use Mudra you'll hold it until the final second and then cast it before the opening fight for either Huton or Meisui (shield or heal + HoT). Then you want to start the fight with either Goka (flame + heavy hitting AoE DoT) or Raiju (stun). Never open with Assassinate or Hyosho.
Advanced
General Advanced Knowledge:
Keep your GCD rolling. You can always fill in gaps with Shuriken, but don’t underestimate your 1-2-3 combo. A common mistake is when people over-rely on their ranged options and LB and end up underutilizing their kit.
If you’re properly positioned, you can survive any incoming cc and heal up. You’ll always be going in and out of melee range, so purify and guard are your primary resources.
Don’t rely on LB too much and play too defensively; one of NIN’s greatest impacts is being able to create spaces for their team. This comes with reading the fundamentals once again.
Make target calls when it makes sense to do so. As a Ninja, you should always pay attention to everything, including enemy buffs and debuffs; when you see someone without purify within your team’s range, call the target out and use your 4-second stun on them.
You can be your team’s primary target caller, but ideally, you will just be a spot caller since you’ll often be chasing stragglers and preventing elixir uses. When chaining your LB, mark the next target you have in mind so you can keep it rolling and your team can assist in getting them below 50%.
Mug is a strong tool but rarely gets fully utilized. There are three uses for Mug. The first two are obvious: to increase damage or to replenish Shuriken stacks. However, the third use is mostly only for LP play. You can fake-Mug to trick people into thinking you’re about to use your burst, baiting their Guard and setting them up for an easy kill.
Always be using your Mudra, never let it cap at 2. Sometimes it’s good to reset it with Huton or Meisui, as you want options between burst, AoE, or cc.
Doton is mostly for cc. Ideally, place it where there are several fights already happening to pad your damage and maintain pressure with Slow. At the same time, pay attention to enemy buffs to make sure there isn’t a Samurai with Chiten up, as Doton will trigger Kuzushi. You can also do the PvE Doton trick with Shukuchi as well.
Hyosho Ranryu - Goka Mekkyaku - Fuma Shuriken. The 6.38 patch “nerf” (in which those three skills were reduced from 25y to 20y) is actually a buff, or at least helps with balancing. It now flows better with Shukuchi and Seiton (LB). With this change, you’ll have a snappier play without finding yourself out of range on either skill.
Shukuchi can be used either defensively or offensively. The update in 6.3 (which increased Shukuchi’s CD by 5 seconds) forces you to be more precise in your decision-making, while the 5y range decrease in 6.38 brings it into line with Mudras and Shuriken, allowing for greater overall flow. Use this to your advantage!
Animation Delays:
There are several animation delays to be aware of, regardless of ping:
Raiju has a 1 second travel time.
All Mudras are instantaneous; damage/healing comes first, then the animation.
Shuriken has a 1 second animation, then applies damage.
Assassinate has a 1 second animation, then applies damage.
The shadow animation in Bunshin will start your GCD after a 1 second delay.
Seiton (Death Link) has a 1 second travel time and a 2 second animation lock when activated; whether you get the kill or fail, the effect will apply after the animation. The difference is, when you manage to get the kill, the target locks into a “death animation”, then dies after the animation. If you die during that 2-second animation lock, the target survives. If you fail to get the kill, the target will stay in whatever motion they were in, and the damage is applied after the animation ends.
How to Counter
Non-targeted AoE skills like Black Mage’s Superflare will reveal a Ninja from Shukuchi’s hide, even when the Ninja doesn’t have any Black Mage stacks on it.
Astrologian’s Macrocosmos will really mess up Seiton because of its ability to restore health instantly.
Scholar’s shields will often prevent damage from Goka, and along with their LB can negate much of NIN’s burst.
It’s hard to perform with an unskilled team; Ninja enables many possibilities, but when no one capitalizes, it’s like opening a box of coal.
You are your own worst counter, whether overthinking or not thinking enough. Ninja has to be in balance with the flow of the entire game; the job is very easy to pick up but difficult to master, because it requires you to understand the whole spectrum of the mode, from basic to advanced, to perform well.
Author: Aiv Vindheart - Sophia

Samurai

Pros
A jack-of-all-trades generalist that is good at everything.
An X-factor LB that can single-handedly flip a game.
On-demand cc immunity.
High skill ceiling.
Cons
No specialization whatsoever. Excels at nothing.
Requires the enemy to misplay in order to use LB.
Uniquely weak to knockback abilities.
High skill floor.
Intro:
I’d prefer to remain anonymous and assume no authority whatsoever. You should evaluate the usefulness of this information for yourself, in practice. After all, this page is static but the metagame is fluid. Read your tooltips, be adventurous in your play, and queue up for the hardest games you can, as often as you can. You’ll get there. I believe in you.
Playstyle(s):
Off-Tank:
The ideal position for samurai to be in is to assist your team’s primary engagers (i.e. WAR, DRK, etc) in getting picks or creating space. It lacks the raw durability of a tank and requires considerable uptime (3+ GCDs) to complete its burst, which is often not feasible as the primary target. SAM benefits tremendously from the space created by another frontliner.
It does, however, have the tools to survive and escape when targeted. AOE bind to lock down pursuers, Chiten to absorb damage, and Meikyo to deny cc. Using these abilities to cover disengagement can be necessary to survive, but it is not optimal, as they also contribute significantly to your dps output. Ideally, SAM’s abilities should be used offensively, but they have great defensive value.
Having LB and chiten both available makes SAM a risky target. Just hanging close to a vulnerable teammate can be enough to make the enemy think twice and stymie their burst. Zantetsuken can “mitigate” by limiting the enemy’s options, but only so long as you make good on the threat.
Dive / Kill Confirm:
Like RPR, SAM has a protracted burst extending across multiple GCDs. You’ll have more luck dumping them into an isolated target rather than in the thick of a teamfight. With 3 gap-closers, a bind, and a stun, you have everything you need to chase down targets with low MP/no defensives and finish them off.
Keep in mind however that your strongest moves all have cast times and only 8y of range so they are hard-countered by a cc-immune target sprinting away, or a high MP target standing in place and recuperating after every hit. Gauge your available resources against the enemy’s before committing.
Solo Melee:
Similar to the off-tank section except don’t anticipate being allowed to play the game. Your aim should be to use your kit to absorb as much damage as possible, away from your team, and then elixir it off. Rinse, repeat.
Try not to overlap mitigations. Purify and Meikyo give you 8 seconds of cc immunity combined. Guard and Chiten give you 10s of mitigation combined. By overlapping, you cut into the time each is independently effective.
Always prioritize AOE Ogi. Ogi Namikiri needs to hit multiple targets, twice, to give the full 16k shields (8k per hit). Losing this healing is huge when your goal is to soak as much damage as possible. Similarly (but to a lesser degree), you should try to fish for AOE Okas to improve your MP economy. This can be difficult as it’s 4 GCDs deep into an engagement (both ogis, yukikaze, and gekko) and is often too slow. Don’t greed for it, but don’t forget about it either.
Basics
POSITIONING! IS! EVERYTHING!
You’re going to spend a lot of your time standing perfectly still in the middle of the action so picking your spot and your moment is crucial.The best spot is often on the periphery; not so close that you take cleaves meant for a teammate (unless you’re trying to do that to proc chiten), but close enough that you can still use your kit. Take fights at odd angles, but don’t cut off your healers or your ability to retreat.The best moment is when your team is attacking with you, or when you can get a kill that will give your team a numbers advantage.I’ll assume you’ve read the tooltips. If not, then go do that.
Yukikaze > Gekko > Kasha
upgrades with Soten (gap-closer) to
Hyosetsu > Mangetsu > OkaThe primary purpose of the single-target combo is to “cycle” to the appropriate upgraded AOE move. Keep your position in the combo in mind at all times.
Hyosetsu is a 2s AOE bind, and what you’ll likely be using most often as it’s what will be up when you engage cold, and what your combo reverts to when the timer expires. It’s a versatile tool that can be used to lock down the enemy in a bad spot or help guarantee an iaijutsu cast (Midare or Ogi).
(Also, I find that cc generates a lot of “aggro” so if you need to get the enemy to focus on you for limit break, Hyosetsu can provoke them. Though this might be a superstition on my part.)
Mangetsu is an 8k AOE. It’s Samurai’s only on-demand cleave that doesn’t require a cast to access, so it’s a good burst option when you need damage now, not in 1.3s. Mangetsu is a great “default” choice when Hyosetsu’s bind isn’t a threat, and Oka’s lifesteal isn’t needed.Oka is a 5k AOE with lifesteal. You can use it to sustain/soak in a protracted fight, but more than likely you’ll only be able to use it once if the enemy is targeting you the whole time. Consider preparing an Oka in advance if you anticipate needing extra HP within the next 15s.Soten is a 4k line AOE gap closer that places you on the far side of the enemy you hit with it. What this means is that you pass through the enemy you target, hitting it and everything else along the way. Additionally, it upgrades your current combo step to its corresponding AOE. Additionally additionally, it is your only (worthwhile) damaging oGCD.
(Efficient and intelligent Soten use is what separates a good samurai from a great samurai. More on that in the Advanced section.)
Mineuchi is a 2s stun. Its damage is negligible—you should only use it for the cc, like you would any stun. What’s most important is its interplay with Hyosetsu; Hyosetsu is cheap and can be thrown out freely, but Mineuchi is valuable and should ideally only be used on targets without purify for maximum effectiveness and lethality. Use Hyosetsu to bait purifies out of the enemy team, and then finish them off with Mineuchi.Meikyo Shisui does 2 things: it gives 3s of normal cc immunity and changes into Midare Setsugekka (16k 8y 1.3s cast single-target nuke) for 10s. Considering each separately:
The cc immunity is a versatile tool that should be used to either guarantee an iaijutsu cast while in the action or cover a sprint escape. Samurai has no burst movement that can be used without an enemy to target, so fleeing while cc immune is your most reliable disengagement option. Try not to overlap this with the Resilience effect from Purify.
It’s worth noting that while Meikyo will prevent half-asleep, it will not prevent half-asleep from becoming sleep.You have to either guard or purify to do that.
Midare Setsugekka is your best single-target burst option, however, with only 10s of hold time, you’ll want to use it ASAP. Whenever possible, you should use Meikyo with a plan to use Midare immediately, as dropping a Midare is a big DPS loss. However, you may want to “protect” your Ogi cast with the cc immunity instead of your Midare cast, as its AOE cleave and mitigation provides more value in teamfights.(It’s worth noting that iaijutsu casts can be “pre-casted” on guarding targets if used in the last ~0.5s of guard. The damage snapshots approximately in the last half-second of the cast, ping depending. Naturally, this can also be used to increase your mobility with slidecasting.)Ogi Namikiri (8y cone aoe 1.3 cast) and its combo action Kaeshi Namikiri (8y cone AOE, no cast) does one of two things, depending on whether it hits a single-target or multiple targets.
If it hits a single target, it does 12k.
If it hits multiple targets, it does 8k to each and gives you an 8k shield.
The above conditions apply per hit. The shield buffs of each hit are separate from one another. It is generally better to prioritize AOE Ogi, as it is both more damage and provides critical mitigation the single-target hit does not. Note that while Ogi will not break your auto-combo, any other weaponskill/GCD will break your Ogi combo. Always follow Ogi with Kaeshi. Also note that the cone of Ogi is wider than it looks, closer to a semi-circle. Practice Ogi Namikiri against the WDP striking dummies to get a feel for its range and width. (I recommend the ones on top of the ship.)Chiten is a mitigation cooldown that is meant to be used as a counter to incoming damage. It does 3 things:
Decreases damage taken by 25% for 5s
Deals back 2k of reflect damage per hit taken
Anyone that hits you is afflicted with Kuzushi, which increases the damage you deal to them by 25%. This lasts 3s, but is refreshed each time they hit your Chiten.

Given these effects, Chiten functions as a reversal. Use it when you’re taking (or expect to take) damage to increase the potency of your burst by a significant margin. It’s worth noting however that it is not strong enough mitigation to withstand heavy focus fire. If you’re being targeted by 3 or more people, Chiten alone likely will not save you. Thus it can be better to proc Chiten off splash damage from a primary target that isn’t you.(Keep in mind that only damaging buttons will proc chiten. Non-damaging cc like miracle of nature and night wing will not proc chiten. Ground effect DoTs like Salted and Doton will not proc chiten (though Salt and Darkness and Hollow Nozuchi will). Channeled damage like Honing Dance and Relentless Rush will proc chiten.)Arguably the most important component of Chiten, however, is its interaction with your limit break.
Limit Break
Zantetsuken is SAM’s limit break, a 20y gap closer, 5y circular AOE on the primary target, on a 120s cooldown. It has a base potency of 24k, but when the target is afflicted with kuzushi it does 100% of their max HP as true damage (a fancy way of saying it bypasses mitigation like guard). It is the hardest limit break in the game to use effectively, as you need to fulfill a number of preconditions in order to execute it, and can only use it ~2 times in a 5 minute game.The conditions are as follows:
The target(s) need to afflict themselves with Kuzushi by hitting your Chiten. You need the enemy’s help in order to kill them. An enemy with a brain will most likely avoid hitting you if they don’t know the status of your Chiten, or can see that it’s up. (You can use this to your advantage.) If you want to be successful, you need to be patient and clever.
The target(s) need to be at or below 100% HP. There are a plethora of shields in the game that can raise an enemy’s effective HP above 100%, allowing them to survive the hit and heal back up. Consider hitting the enemy beforehand with an AOE cleave to clear out any lingering shields, and be wary of deliberate baits. If it seems too good to be true, it probably is. Check their HP bar. Additionally, the target cannot be invincible at the time of execution. This is especially important to remember because Zantetsuken aligns naturally with two invincibility LBs: PLD’s Phalanx and SGE’s Mesotes.
You cannot be cc’d. Every cc but heavy and half-asleep will prevent Zantetsuken. You will most likely need to be cc-immune, either through purify or meikyo, to even be able to cast Zantetsuken. And even then, special cc (Fear, Charm, Meteo, Miracle) can bypass these immunities.
You cannot afford to die during the cast. Zantetsuken takes almost a full second from initiation to completion. While the damage is calculated when the button is pressed (i.e. the enemies in the AOE area are checked for Kuzushi), it is only applied when the animation concludes. Given that you will be actively taking damage during the cast, it is not uncommon to die and “ghost” the limit break, spending it but doing no damage. A perfectly timed WHM Miracle of Nature cc can also cause the lb to ghost.
Given these conditions, how do we land Zantetsuken successfully? The bare minimum components of a successful Zantetsuken are Chiten and Purify. Having Guard available also helps but is not always necessary. Meikyo can be used to supplement the immunity window of Purify. Ogi Shields can give you more leeway to execute successfully if you set them up in advance.The basic process is:
Wait for the enemy to start hitting you.
Pop Chiten
Purify and/or Guard as needed
Wait for Kuzushis to appear
Let it rip!
Don’t be too trigger happy. Whenever possible, wait until the last second of the first Kuzushi to appear before using Zantetsuken. This will give you time to determine whether you’re being baited, as well as make time for more Kuzushis.If you have full LB, you can expect the enemy to do one of a few things: (1) hesitate to attack you until they know your Chiten is on cd or until they absolutely have to (2) attempt to bait your Zantetsuken and neutralize it (3) burst you as hard as possible so you die before you can use it (or worse, ghost it). The answer to each of these situations as follows:
You can abuse the enemy’s hesitation to play more aggressively. If they refuse to attack you, you can cast for free. Alternatively, you can stick close to your allies to either proc chiten off splash damage or protect them from it.
As stated above, don’t jump immediately at the first available target. Take a couple seconds to check their HP bar in the enemy list. Zantetsuken snapshots on press—even if Kuzushi falls off during the cast, it will still do full damage.
Depending on what tools they commit to killing you, survival may be impossible. You should consider comboing Chiten > Guard to have a better chance of surviving the Zan cast. Don’t be obvious about it, though.
Advanced
Zantetsuken FAQ
Who Should I Zantetsuken? And When?
The best targets for Zantetsuken are as follows:
Multikill > High value target > High HP target > Low HP target
Killing 2 or more targets with Zantetsuken is enough to decide most fights.
A high value target is one with full LB, or a channeled LB that can be neutralized by killing them (SCH Seraph, SMN Bahamut/Phoenix, SGE Mesotes, etc).
High HP targets like tanks are often inaccessible to typical one-shot combos (like MNK’s and MCH’s) so picking them off is useful. Just be wary because they all have ways to bait you.
You should hesitate to spend Zantetsuken on a single lower HP target without LB, unless it’s a situation that will help you gain a crucial lead or win the game. (Such as preventing stall in OT, for example)
…more than anything however, you should be using Zantetsuken to gain a numbers advantage on the enemy. Turning a 5v5 into a 5v3 is huge. Turning a 1v5 into a 1v3 is useless.
How does Cover interact with Zantetsuken?
Cover “redirects” the target of your actions to the PLD. So the PLD is checked for Kuzushi instead of your target. This can be especially vexing during PLD LB, as their invincibility will neutralize Zantetsuken and they can extend it to any ally they choose.
Should I ever use Zantetsuken without Kuzushi up?
The short answer is No. The long answer is that there are fringe scenarios in which the 24k cleave can synergize with another LB for a multi-kill that would be impossible otherwise (ex: GNB LB), but these are comp dependent and highly situational. The primary value of Zantetsuken is that it is a play unto itself and requires little-to-no teamwork to get picks.
Opener / Closer Combo
A typical teamfight opener looks something like:Soten > Hyosetsu > Ogi > KaeshiThe Hyosetsu bind sets up nicely for an AOE Ogi, and then Ogi and Kaeshi set up your personal shields. Weave Meikyo/Chiten when you expect to take cc/damage (ideally earlier so you can put more damage inside of Kuzushi, but it depends on the enemy), then be sure to dump Midare quickly. Hold stun to use on the first target to burn purify.Most kill combos on Low HP/MP targets involve Mineuchi (stun, negligible damage) and some combo of Midare, Ogi, and Mangetsu. Here are some examples, but you can be relatively flexible with it so long as you don’t break your Ogi combo.Stun > Midare (~1 GCD, 16k)
Ogi > Stun > Kaeshi (~2 GCDs, 24k)
Soten > Mangetsu > Stun > Midare (~2 GCDs, 30k)
Kaeshi > Soten > Stun > Midare (~2 GCDs, 32k)More important than the sequence of your burst is prioritizing larger potency hits for Kuzushi windows. Midare hits for 20k under kuzushi, and single-target Ogi hits for 15k. At 3s, assuming no refresh, that leaves time for ~1 iaijutsu and a soten, though you may be able to snapshot 2 GCDs with perfect timing.
Slidecasting
Here’s a guide explaining how to slidecast so I don’t have to. I strongly recommend practicing slidecasting against the striking dummies at WDP until you’re comfortable with it, as it will increase your mobility considerably.
Soten Optimization
Soten does a lot of things at once. It’s a gap closer, a weak line AOE cleave, and procs the upgrade for your auto-combo. As such, there are a number of rules you should observe to maximize its effectiveness. The primary use case is for burst movement to close distance on a fight, but on top of that:
Hit as many people as possible with Soten. This may mean targeting someone behind/past your primary target, and can make SAM very targeting-intensive when played at a high level. The Soten line is fairly wide, experiment on the WDP striking dummies to get a feel for it.
Don’t overwrite or waste Kaiten, the auto-combo upgrade buff. If it’s up, spend it before using Soten again, and try to avoid using Soten if it upgrades a skill you don’t need. (ex. don’t use Oka at full health)
Conserve Soten for skills you need, such as saving a Hyosetsu to help you bind and flee, or an Oka to help you hold the crystal longer. Alternatively, if the enemy isn’t focusing you, spamming Mangetsu will add up fast. (Soten + Mangetsu is a 12k cleave on a ~7s cd assuming full uptime)
Your combo timer lasts 15s, but Kaiten only lasts 10s. This means that it’s possible for Kaiten to fall off and “downgrade” your combo step back to its single-target form. It’s also possible for your combo to expire with Kaiten still up and “reset” from a later step (Mangetsu/Oka) back to Hyosetsu. Don’t sit on Kaiten or your combo for too long.Between the 10s Midare window, the auto-combo timer, being locked into Ogi combo, and Kaiten’s 10s window, Samurai has to keep a lot of plates spinning at once. Forced downtime can lead to substantial dps losses. Try not to prep anything you aren’t in a position to use immediately.
Triple Ogi
Kaeshi Namikiri can be held for 30s. While Ogi will not break the auto-combo, any weaponskill (GCD) will break the Ogi combo. This means that the next GCD you press after Ogi should always be Kaeshi. However, you have a long window in which to do this—longer than Ogi’s cooldown. Meaning you can Ogi > (wait 20s) > Kaeshi > Ogi > Kaeshi.While you likely won’t encounter any situations in which you’ll use Ogi 1 and then twiddle your thumbs for 20s straight, it’s still useful to know that the cooldown starts rolling from the moment the cast is complete, even if the combo isn’t.
How to Counter
Knockback is basically a 1-2s silence to a SAM, and they’re often in prime position for it, being a melee frontliner. So long as a SAM is moving, they can’t use their best buttons, so jobs with AOE displacement moves (ex. DRK, MCH, SMN) can grief them out of their burst by knocking them around like a pool ball.
Watch their buffs and LB status closely. Know what Chiten and Meikyo (see below) look like and what they do, and respect them. Don’t throw your cc into a black hole and don’t throw your life away on a stray hit.

Special cc is strong against every job, but especially so against SAM as it relies heavily on its normal cc immunity to execute its gameplan. Miracle of Nature can safely stop a SAM in their tracks, even when they have LB available.
Flee. Run. They can’t burst you down without standing still. If you run, you’ll force them to either burn cc to keep you in place, reduce their damage significantly to attack while chasing, or give up.
Abuse LoS. Breaking line of sight will cancel their casts and can even prevent them from using Zantetsuken on you if you react quickly enough.
Author: Anonymous, Very Awesome Person #1
Reaper
(Disclaimer: Still WIP, ~80% Complete)

Pros
Durable wiseman (crystal pusher)
3rd best wiseman: Nebula GNB > DRK > RPR
AoE guardbreak LB on 45-60s cd window that can fill the same role as MoN or MNK LB in target burst
Gapcloser lets you port back within 10s, excellent for rotating to elixir
Can ramp up to strong 1-2gcd burst windows which will typically be unexpected
Cons
Job has a high skill floor, it is one of the most difficult jobs to play well, full stop. It’s part of why you see so many horrible RPRs out and about.
Damage is all combo-based: if you can’t land 2-3 GCDs on targets consistently you won’t contribute much
Combos are telegraphed: warrant makes it incredibly obvious when a target is about to be bursted
LB window is short at only 15s of enshroud stacks: many times you’ll have to gimp your LB damage to get out and elixir
Dying results in a loss of Plentiful Harvest stacks, ruins your 1-2gcd burst ramp up
No hard CC outside of LB, it can be difficult to lock down targets fleeing after they burn resources
Playstyle:
Wiseman (crystal pusher): RPR has strong tools for being the primary (or secondary) crystal pusher on a team:
Guard (duh)
Recuperate (duh)
Arcane crest: 12k shield (10% dmg buff while shield is up) + 6k AoE apply HoT on shield break
Hell’s Ingress: can gap close away from crystal after DCDs are down, sneak a quick pot in if you’re not chased, and port back into the fray
Be mindful you’ll be vulnerable coming back in without DCDs, and will need to position carefully. Your enemies know your dmg is combo based and will exploit it if you get caught out!
You cannot port back if you are LOS’d from your portal! However, you can use your gap closer to ride along walls and flip around a corner for quick LOS in a pinch
Basics
Plentiful Harvest:
4k base dmg, ramps up to 24k at 8 stacks
Stacks are generated by kills/assists and usage of Soul Slice
First harvest should be dumped ASAP (without dying) for first LB close to 45s
Subsequent Harvests should ideally be used with stacks for strong 1-2gcd burst
Grim Swathe:
4k ogcd conal aoe that applies heavy for 3s
Unlocks two charges of Gibbet/Gallows (8k dmg gcd) for 10s
Will typically be used either under Death Warrant (typical burst), between warrants (shallow burst), or immediately following Communio under Death Warrant (short-circuit/full LB burst)
Death Warrant: The Bread and butter of your combo damage
Lasts for 6s, 50% of all health dmg (not shields!) applied during the warrant will “pop” as true damage when the warrant expires (true damage will ignore mitigations, including guard! Think MNK RoE before it was changed)
Warrant will change to Harvest Moon upon usage
Ideally combo’d with a double weave from Soul Slice into Grim Swathe immediately followed by Harvest Moon. If the target has not guarded, immediately follow with Gibbet/Gallows (I will refer to both as Gibbet from here) and the second Gibbet charge if the target still hasn’t guarded
Prep | 1GCD Dmg (Base) | 2GCD Dmg (Base) | 3GCD Dmg (Base) |
---|---|---|---|
Get plentiful harvest out before or right after this Crest (mit + 10% dmg buff for first 1-3gcds) + Gapclose + Warrant | Soul Slice (8k) + Grim Swathe (4k) + Harvest Moon (4-8k) = 16-20k dmg (base, + 8-10k warrant dmg) | Gibbet (8k base, +4k warrant) | Gallows/Soul Slice (8k base, +4k warrant) |
If the target does not guard, and you’re able to land all 3gcds, this will come out to 32-36k damage over 3gcds (potentially +10%) with a warrant pop of 16-18k, totaling 48-50k dmg (base). It’s not going to delete someone on its own, but combined with a team burst? Now we’re COOKIN
This opener exists in a bubble: in reality expect your target to guard or gapclose away. Your first warrant typically won’t get much true dmg value outside of forcing a guard, but forcing a guard is still good! In this scenario you can look to apply your remaining 8k gcds (and any ogcds) on the next burst target, or continue with the same target after their guard drops
This opener is also your typical warrant burst window. Harvest Moon can be moved around, but ideally you’ll still apply Grim Swathe near gcd1: the heavy will help you land an entire combo on targets that won’t guard
If you’re near LB, it may be better to drop Death Warrant+Harvest Moon and use this as a shallow combo to force DCDs: when you see that guard and purify go up, it’s time to FEAR YOUR ENEMIES INTO SUBMISSION
Tenebrae Lemurum (What a stupid name, just RPR LB):
Applies Hysteria/Fear for 2s to all enemies in AoE around you for 2s
Fear will break enemy guards and ignore purify, they will run away from you for 2s
Strong combo potential after a friendly DRG goes up for Skyshatter, or right as.after a friendly GNB executes Terminal Trigger, the 3s aoe burst dmg stun at the end of their LB.
The timing for these combos is much tighter than a DNC LB!
Gives you 5 stacks of enshrouded for 15s: each stack will give you one usage of Cross Reaping (8k fast gcd, single weave window), and all remaining stack(s) can be used to cast Communio: 16k dmg 1.44s cast
Gives you one charge of Lemure’s Slice, a 4k ogcd 3s conal aoe bind that will be available as long as enshrouded stack(s) remain
Actually using all of your enshrouded stacks will be highly situational: in reality you may have to retreat to reset and not die, or it may be better to short-circuit your LB burst: doing an early Lemure’s Slice into Communio + Grim Swathe + Harvest Moon into Soul Slice/Gibbet
Bard

Pros
Has one of the best ccs in the game
Has team damage and lb boosting buffs that add a lot overall
Burst rotation can do solid, often underestimated damage
Castable purify buff that also adds heal up on target if triggered
Cons
Burst is quite a few gcds long
Very low damage outside of burst cycle
Middling damage overall unless the enemy stays unusually stacked
Punished for being close to the target
Basic attack slows caster, hard to cancel mid-cast
Difficult class to apply meaningful pressure
Hard class to carry underperforming teammates with
Playstyle(s):
Stay Back:
Basic playstyle--play bard as it’s intended, stay in the back line and make pin-cushions of your targets
Use Silent Nocturne to CC kill targets
Use repelling shot to escape when pressured
Do not step on the crystal unless the coast is clear
Back out to range once the fight on the crystal starts if holding it down
Inappropriate Tank:
The Advanced strategy, play bard the exact opposite of the basics
Position aggressively forward, essentially taunting the enemies so you can soak their burst into your Guard
Use Repelling Shot to force purifies or stop runners
Be as much of an aggressive nuisance as possible
Basics
General Play:
Aim for the target your teammates are beating up.
Save Silent Nocturne for after the enemy has used Purify at least.
Open with Apex Arrow and Blast Arrow to give your team a 10% weaponskill/cast speed and 5% damage up buff.
Your burst rotation should look something like: Apex Arrow - Blast Arrow - Empy Arrow - Paean (on a teammate getting targeted) - Pitch Perfect - Silent Nocturne - Pitch Perfect - Emp Arrow.
If you’re hanging back, put Paean on your teammate who’s getting the most beat up once they’ve used Purify or before they have to use it. The healing up and purify itself can be life-saving.
Paean is a powerful ability, so use it smartly, but sometimes if you’re out of burst options and have Paean you can use it on yourself to get that Pitch Perfect charge for an 8k burst (at max range) and however many Empyreal Arrows you have on hand.
Pitch Perfect reduces the charge time of Empyreal Arrow by 5 seconds, so try to clear your Emp Arrow’s 3 stacks (all stacks fire at once) before using Pitch Perfect to get that benefit.
Pitch Perfect is generated by using Nocturn or Paean, they do not stack so try to use Pitch Perfect from one ability before using one of the abilities that generates a charge.
Repelling Shot is a very powerful CC that is underutilized in my opinion— for basic use it’s simply an escape that roots the target and launches you backwards. This is great for kiting and forcing enemies to burn gap closers if they want to keep up.
If you’re playing forward like in the Advanced strategy below, you can often make a target burn Purify just to cleanse it off, this makes them an easy kill for Nocturne once the Purify buff ends if your party is paying attention
You can also run forward to stop a runner from leaving the team fight and be launched most of the way back to a safe position
Pushing the Crystal:
For basic Bard play do NOT be on the point unnecessarily
Do be on the point when necessary
Times to Not Be on the Point
The enemy team has heavy AoE or Guard Break LBs ready like DRG, SMN, WAR, DNC
When the enemy team has high cleave classes like DRG, BLM, DNC, SMN, or SAM bullying the front line
When your team has lost the team fight and you should be retreating (unless you're trying to die fast to rez with your team)
Times to Be on the Point
When your team has run ahead of the point and needs someone to push the crystal—BRD is a good choice to stay behind
When your Tank/Melee needs to swap out so they can go Elixir and you have Guard, Purify, and Mana so that you can hold and retreat once they return or swap with someone else
When someone needs to be on the point in Overtime or make sure Overtime happens
We like to call it "Ranged Disease" when ranged players are not willing to risk stepping onto the point, even when the team desperately needs it
See the Advanced section for the exact opposite of ranged disease playstyle
In general, don't be afraid to be on the Crystal when necessary—there are times when even the ranged classes must step up!
Silent Nocturne (Nocturne):
This is a Bard’s strongest ability. Used right you can help secure kills almost every CD
There are no absolute rules, other than don’t waste it on a target that has Purify or Guard up, but think before you shoot, and don’t keep it on CD, it’s okay to save the charge for the right moment
There’s some general use cases to consider:
The Opening
Debatable usage, at low ranks the opening target may not use Purify fast enough and die in the silence window
At high ranks it’s better to save till at least Purify has been used if not Guard as well
Purify Up
Nocturne is really hard to notice if you’re on the receiving end, and sometimes it might not be noticed at all till the target tries to recuperate and realizes they can’t
In this 1-2 seconds you might buy your team enough time to finish them off before they can Purify + Recuperate
This is a good strategy if a target has dipped really low, even if they have Purify, and your team is laying into them
If you have a WHM on your team watch for their Miracle of Nature target, if you hit it with Nocturne right as Miracle of Nature ends they should be dead after 4-7 seconds of cc depending on if they have purify (and if your team is worth anything).
Secondary Target
Do you see a WHM or AST spamming heals or casting them? Is the Paladin rushing forward to probably Guardian cover a teammate? Stopping them while your teammate finishes off a target may be the best use in this scenario
LBs
Part of what makes great BRD great is the number of LBs you can help shut down
In general, Silencing someone before an LB goes off may be the right move to save your teammates
Specific LBs you can help shut down:
GNB: You won’t stop a GNB’s LB but you can prevent them from activating their stun and damage early, which is what high-level GNBs do — just watch that they don’t have purify up when they begin their lb just for this reason
DRK: Generally a DRK wants to wait to heal till near the end of their LB or stall for more time on point with Guard, watch their buff timer, and strike with Nocturne before it falls off to throw a wrench in those plans
NIN: After countless nerfs NIN LB has an increasingly tight window of time it can LB again if it successfully instant kills. Hit them with Nocturne to prevent the LB from going off when a Teammate is low, or hit them with it immediately after they’ve used to it keep it to a one-kill LB. In general, you should always dogpile a NIN that has used their LB to prevent them from getting multiple kills.
SAM: For SAM LB to be an insta-kill they have to hit a target while they have Kuzushi, which is a 3-second debuff. Coincidentally, Nocturne is a 3 second CD. Apply it near the end of a SAM’s Chiten and you may prevent them from getting their LB off on multiple teammates. You will also give yourself a debuff and be open to insta-kill, so be at max range and run or LOS them immediately and hope you don’t get snapshotted.
RPR: After RPRs pop LB they’re Enshrouded for 15 seconds. They get 5 charges that they can spend on 8k basic attacks or use Communio which hits for 16k AoE and consumes any remaining charges. Most Reapers will greed and try to do 4 slices and finish with Communio, which can bring them near the end of their Enshroud window. Nocturn and stop them. Additionally after using their LB RPR is animation locked for a bit, your team may want to turn and burn the Reaper, and your Nocturne can help keep them from running.
MNK: Monk can’t use LB if silenced or rooted, this means if you see a Monk use Enlightenment on your teammate, you can stop them from being able to follow-up within the short time they have to capitalize on the extra 12k damage to their LB provided by Pressure Point. This can stop it from being a guaranteed one-hit-kill on your teammate.
SMN: If a SMN has just used Bahamut they’re typically looking to secure a kill with Crimson Cyclone combo and Fester. Hit them with Nocturne to buy your teammates the time they need to hit Recuperate
DNC: DNC’s LB animation and when it goes off are quite long, hit them with Nocturne before you get charmed (if you were even close enough). DNCs can extend the length of their LB's cc if they hit anyone charmed during the initial two seconds. There is, however, a long animation lock before they can actually use a damage-dealing ability after LBing. By silencing them for three seconds you can prevent them from extending the cc on your teammates.
WHM: White Mage LB is typically followed by Afflatus and Seraph Strike to capitalize on the damage from the laser. Using Nocturn here can again buy your team the time it needs to heal or get out of LoS.
Do not waste Nocturne trying to silence a WAR in LB or PLD, or a PLD’s Guardian’d ally in general as it will not work
Advanced
Basic bard play is how the class is meant to be played, but in my experience does not typically generate enough forward pressure to carry weak teammates. Advanced bard play is meant to make space, draw aggro, and eat burst so your teammates don’t have to. Forcing an enemy team to waste single-target LBs on you, especially if you live, is a huge win for this type of play.To be clear, the following advice is basically how you play a Tank, hence the nickname "Inappropriate Tank." You can do the same on DNC, RPR, SMN, and NIN (wouldn’t recommend it on NIN) just with different abilities of course.
Inappropriate Tank: Or, How to Taunt in CC
Opening:
Get Apex and Blasting off as fast you can on the nearest target so your team has the buff
Throw Paean on yourself while running in to start the real team fight
Guard as soon as you've aggroed the enemy team
With any luck people will waste burst and even cc into your Guard
Ride out Guard in full or cancel a few seconds early with Sprint
Enemies are often waiting for Guard to end to hit you with cc, expecting its full length
Canceling early and with sprint + Paean saves you a GCD of having to cast Sprint after Guard ends and gets you a head start on retreating
Repelling shot off a close target if you can or run like a bat out of hell, spamming recuperate as you go to the nearest place you can hide behind LoS
If you’ve lived and aren’t being chased, stop and elixir if low on mana
If you’ve lived and are being chased, keep running, there’s a high probability the class chasing you is more important to their team’s team fight than you are
Once you’re healed/mana’d up get back to the fight, hopefully, your team has scored a kill or at least forced one target to burn Purify/Guard
Note that you have burned Guard if not Purify as well, so play safer now and revert to basic Barding
Aside from the opener you basically repeat this throughout the match, positioning yourself in ways to bait them to focus on you and split their damage. This may mean from here on letting your melee engage, then slide up to the front so that someone on the enemy team thinks to switch to trying to snag the “easy kill” that is the out of position Bard. Your goal is to frustrate them by living.
The Rest of the Match:
Continue being a distraction, the best way to do this you'll have to judge by your enemy's reactions
If the enemy team is running at your team to start a fight, can you step out in front and bait again?
Is there LoS near you for you to retreat or Ground Potions for you to steal?
What LBs can you soak?
In general you can remain a distraction by pressing forward to a point adjacent to the front line, but don't stand within it unless you want to be cleaved by AoEs.
You should be standing far enough away from your teammates so that AoEs targeting you are wasted by only hitting a single target.
Addendum:
If your team is suffering from ranged disease or lacks a real front line, it may be on you to step up and tank on the crystal
If the question is between nobody at all making a front line, or you placing yourself forward so the rest of your team can operate, you're better off trying than not
Important Note: I consider this the advanced playstyle because you really need to know how to survive focused burst. This means pre-emptive guarding, purifying quickly, and spamming the hell out of recuperate inbetween sprinting. If you play out of position like this and die often, or in the opening, your teammates are absolutely going to think you’re an idiot or trolling. One or two deaths may happen, if you're dying more than 3-4 times in many matches you need to play safer and work on the above/fundamentals.Not everyone, especially at the high levels, will fall for an early Guard bait, and they may just leave you there looking like an idiot guarding against nothing. But more often than not, someone will bite.
Fluidity
The two playstyles have been separated above but good Bard play involves merging the two. You need to know when to switch between being the safe Bard in the back avoiding unnecessary damage and when to be the dumb Bard trying to bait the enemy. Knowing when to do which is a matter of practice and experience.
Limit Break
Your Limit Break is a DPS boost for your teammates, a weaponskill and movement speed boost for yourself, and an LB gauge boost for all.
Your Limit Break is now an aura around yourself that will apply to teammates as they come in and out of range of 30 yalms
By being an aura it means if you die there’s no more buff, unlike how it was before, so try to play safer while it’s up or don’t just try to use it shortly before dying
The ability lasts 30 seconds and the animation lock is fairly long, you want to use it ideally before the next team fight
If your team is close to LBs you may want to use it early to get them to full LB before the next team fight
The movement speed provided by the LB effectively negates how slow you walk while casting basic attack, meaning you’re much freer to use it during this time
Target Calling
Bard makes an excellent target calling class
I highly recommend using a target-calling macro and calling out your Nocturne kill target if no one on your team is calling targets
Calling targets can be awkward at first but you should strive to be better at it no matter your class!
See the “Fundamentals” section for more advice, but in general, try to kill targets front-to-back, it’s the simplest strategy for solo queue
Macros
Cast Paean on Party Members
/merror off
/pvpac "The Warden's Paean" <1>
/micon "The Warden's Paean" pvpaction
Replace <1> with 2-5 to have a macro auto-targeting each possible team member on your bars
Cast Nocturne on Enemy Players by #
/merror off
/pvpac "Silent Nocturne" <e1>
/micon "Silent Nocturne" pvpaction
Replace <1> with 2-5 to have a macro auto-targeting each possible enemy as they are listed (keep the e before the number)
Target Call Macro
/merror off
/micon "attack1" enemysign
/mk attack2 <t>
/mk attack1 <attack2>
/quickchat "Attacking Target" <t>
How to Counter
Ignore them and kill their teammates, then kill the Bard. Almost every other class is a greater threat than a Bard outside of its absolutely annoying CC. Damage wasted on them is damage that could be better spent on a higher-priority target.
If your teammate is being effectively taunted by the Bard into splitting DPS, switch to focus with them. There's a higher chance or scoring the kill and making your teammate's bad decision into a kill rather than a complete waste.
Bard’s one escape is Repelling Shot and Sprint, you can pin them down if the team coordinates.
Author: Verre Bellareve - Mateus

Machinist

Pros
Lorem Ipsum
Cons
Lorem Ipsum
Dancer

Pros
Lorem Ipsum
Cons
Lorem Ipsum
Black Mage

Pros
Lorem Ipsum
Cons
Lorem Ipsum
Summoner

Pros
Incredible AOE burst with Crimson Cyclone and Summon Bahamut Limit Break.
Decent utility with Mountain Buster and Slipstream.
Life saving/Game shifting abilities Radiant Aegis and Summon Phoenix.
Strong finishing oGCD Fester.
Cons
Lacks meaningful escape options compared to the other casters.
Can put itself into a tight position when using Crimson Cyclone’s first cast.
Introduction
Hey ya’ll. My name is Lelouch Masamune, and this will be my 2nd PvP guide, this time on how to play Summoner in Crystaline Conflict, (and across all PvP modes). I’m a Multi Top 100 player in the Crystal Data Center, where I placed Top 30 in 2 consecutive seasons as a Scholar/Summoner main. In this guide, I will teach you everything I know about Summoner; it’s in and outs, your Do’s and Dont’s and much more. So without further ado, let’s begin.
Ability Breakdowns
Just like I did in my Scholar guide, I’ll be going over what each and every button Summoner has and does in order to alleviate any confusion and to gain a better understanding of what they do. In other words, we’ll be cutting down the essay that is this:

To this:

8000 AOE Damage to target and surrounding enemies.
Creates a ring around target, anyone who enters ring takes 4k DoT damage.
Increases movement speed of self and party members who are in ring by 25%
So with Slipstream out of the way, let’s explore Summoner’s other buttons which are:

5000 Damage GCD
Basically use this if you have literally nothing else to do/use.

Two part ability, where the first cast is a dash to target dealing 8000 to target and surrounding enemies. Ability changes to:

Which deals 12000 to target and surrounding enemies, as well as knocking them (those around your target) back.

Puts a barrier on target ally or self that grants 10000 potency shield, as well as 20% damage reduction.
Note that the damage reduction aspect of the ability is removed if the shield is broken.

Deals 4000 damage in a rectangular shape to target and nearby enemies.
Afflicts target with a root, and surrounding enemies with a slow of 75%, both of which last 3 seconds.
Draws surrounding enemies in to first target.
Really powerful setup ability, use it wisely!

Deals 4000 damage scaling to 8000 damage the lower the target’s HP is, (capped when target is at 50% HP).
Ability is an oGCD, so use this in between GCD casts or spam it when target is below 50% HP
And now for Summoner’s Limit Break(s), (Yes, two limit breaks!)

Summons Bahamut to target area for 20 seconds doing two things immediately, and two things during/after the cast.
Immediately does:

18000 AOE Damage!!!
Changes Ruin III to:

7500 damage GCD
Same deal with Ruin III: Use this if you literally have nothing else to use.
After the cast, Summon Bahamut changes to another GCD which is:

12000 damage AOE to target and surrounding enemies.
You activate this by hitting the LB summon button again while Bahamut is out.
And lastly, throughout the summon of Bahamut, Bahamut will periodically cast:

Which is 6000 pet damage.
REALLY ANNOYING IF IN LOS, SINCE IT CAN CANCEL THINGS LIKE YOUR ELIXIR!
Summoner’s second Limit Break is Summon Phoenix

Which, just like Bahamut, summons itself on the targeted area for 20 seconds and does two things immediately upon cast, and two things during and after cast:
Immediately does:

Gradual 4000 HP heal for self every 3 seconds for 15 seconds.
If HP is below 25% or if duration is over, heals for 12000 HP.
Basically a built in Summon Seraph from Scholar which is huge.
Changes Ruin III to:

Deals 5000 damage to target on instant cast GCD speed.
Spam this if you have nothing else to use. Damage adds up!
After the cast, Summon Phoenix becomes the following GCD:

6000 AOE damage to target and surrounding enemies.
3000 DoT damage
And lastly, throughout Summon Phoenix’s duration, will periodically cast the following:

4000 potency pet damage.
Reduces target’s damage dealt by 50% for 5s.
Basic Rotations + Combos
Now that we know how versatile Summoner is, let’s explore the standard rotation and potential combos you can pull off with Summoner. The standard rotation you should aim to maintain throughout an entire match of Crystaline Conflict should be the following, (assuming perfect uptime):

And so on and so forth.
The idea is to open with all your burst abilities and get your Crimson Cyclone out as early as possible, since it’s your highest damage dealing ability, while simultaneously inflicting annoying CC such as roots, slows, and DoTs. When you get the opportunity, you weave in your Fester, which acts as a “mini execute” which can deal up to 16000 damage when using both charges. This entire rotation alone does 63,000 damage assuming the target has no form of mitigation or shielding, which is basically an entire target’s health pool. Be sure to use Ruin III as often as possible when you have down time; the damage adds up!
Now for some combos:
Combo 1:

This combo is essentially how you 100-0 someone as Summoner. This is probably the deadliest combo there is, and if paired with anything else, (i.e. WHM LB, RDM LB, etc.) then consider your target and potentially surrounding targets dead.
Combo 2:

This combo is the Phoenix alternative to the aforementioned Bahamut combo, with the only caveat that you now have access to a deadly DoT and instant cast GCDs. Really powerful for checkpoint plays and times when enemy team is clumped together.
Do's and Don'ts
DO:
Try and use your Crimson Cyclone + Fester whenever they come off CD. These abilities alone can sometimes be game changing and can essentially secure kills for your team when you have really low health targets.
Put Radiant Aegis on the teammate that you expect to take a significant portion of burst/opening damage such as a tank or front line melee like MNK, SAM, etc. The Damage Reduction aspect of the ability should not be underestimated, and should be used as often as possible. Try not to be greedy with it either, by casting it on yourself, (unless absolutely necessary). In summary, use Aegis wisely and frequently!
Use Slipstream in really tight corners, (if you can) in order to maximize its effectiveness. The DoT damage from the ring, as well as the movement speed buff that is created from the cast is more confined and will allow for a better result than if used in an open space.
DON'T:
USE BAHAMUT OR PHOENIX WITHOUT USING THEIR SECOND GCDs!!! Seriously, they’re there for a reason, and to use the summons without their second abilities, is very, very bad.
Use Mountain Buster or Slipstream on a single target. unless absolutely necessary
Fester targets that aren’t <=50%, (pretty self-explanatory).
This combo is essentially how you 100-0 someone as Summoner. This is probably the deadliest combo there is, and if paired with anything else, (i.e. WHM LB, RDM LB, etc.) then consider your target and potentially surrounding targets dead.
Useful Macros
This guide wouldn’t be complete without macros, so I thought I’d include the macros that I find the most useful and beneficial. Summoner is a job that kind of requires macros in order to be at its most optimal. Below you will find the macros I use when playing. Try and find at least 5 Hotbar spaces to fit them. The format will be lines of code/macro code in between two bars with a title/macro name before the first bar as follows:
Radiant Aegis Cast on Party Member 1-5
—---
/merror off
/pvpac "Radiant Aegis" <1>
/micon "Radiant Aegis" pvpaction
—---
Summon Bahamut on Target, No need to aim LB
—---
/merror off
/pvpac "Summon Bahamut" <t>
/micon "Summon Bahamut" pvpaction
—---
Summon Phoenix on Target, No need to aim LB
—---
/merror off
/pvpac "Summon Phoenix" <t>
/micon "Summon Phoenix" pvpaction
—---
Useful Macros
And that’s the guide. I hope that this guide is useful and helps you on your journey to mastering Summoner. Summoner is the most powerful caster in all of PvP; but with great power comes great responsibility so be sure to play it to the best of your ability. Summoner, (just like most things in the game) definitely falls into the category of easy to learn, but hard to master. It can be an absolute powerhouse in the hands of the right player, so be sure to practice, practice, practice! With that said, I wish you the best of luck with your matches!
If at any point you would like to contact me, you can add me on Discord at SuspensionXD#1597. I will be making a visual/youtube version of this guide in the near future when I have some free time, so be on the lookout for that as well! Links to my Youtube, Twitter, and Twitch can be found below:
Twitter: Lelouch Masamune (@TheRealLelouchM)
Youtube: Lelouch Masamune - YouTube
Twitch: SuspenshunXD - Twitch
Author: Lelouch Masamune - Malboro

Red Mage

Pros
Great mobility
Versatile toolkit
Consistent damage
Strong wombo-combo with LB
Cons
Burst takes time to build up and needs to be in melee range for a long time
Will die if glanced at menacingly
Mobility is based on enemy players
A trade-off between survivability and damage (white & black shift respectively)
Playstyle(s):
Team Fight Focused:
In this style your goal is to essentially be something akin to a ‘support dps’ where you let your frontline and other actual tanky dps take as much of the heat of the fight as possible. Once you notice the enemies are focused on one of your teammates or the enemy is cc’d and not as likely to kill you, charge in and start hitting the focus target with your melee combo. If you can get your entire combo off in black and then use a Displacement Verflare the enemy will likely be dead.
Your goal is NOT to fight on point for an extended amount of time even with this focus, as AoE cleaves can and will chunk away your health pool and leave you very susceptible to dying.
Do keep in mind though that if you do get caught in those situations white shift with magick barrier can actually keep you alive rather well. The downside to this is you’re not going to do a ton of damage. But you can swap between white and black shift mid combo and especially using verflare at the end on a stack of enemies or to finish someone off can be huge.
Rat Focused:
First off, ratting by definition is being a nuisance in the enemy’s backline, it’s essentially playing for those assassinations where you chase down a squishy and murder them mercilessly and relentlessly.
With the RDM nerfs in my opinion ratting is not the best focus, however there are some things within here that will be useful especially in solo queue and when your team needs someone to secure kills.
The goal for most rat focused things in a general sense is to find the squishiest target or the one that will be the easiest for you to destroy in a 1v1 situation and just spend the entire time making their life a living hell.
RDM’s two stacks of charges that both increase enemy damage taken and reduce damage dealt to you do an excellent job at tilting these fights in your advantage, plus it makes it really hard for an enemy to fully ‘escape’ from you.
Basics
General:
Use your AoEs as much as possible on groups of players, being resolution silence, verflare/ verholy, limit break unless of course going for specific kill on someone.
Use displacement and corps-a-corps to reposition yourself in fights and to escape being bursted
ALWAYS HAVE A PLAN FOR ESCAPE there will be more on this later but if you don’t have any movement cooldowns, probably don’t charge into the enemy team.
In general you want to be getting ready to leave team fights at 4k or less mana. This goes for just about any class, but with how squishy RDM is it’s extra recommended.
Opener:
The most general opener is to use magick barrier before the fight begins
No matter what, charging in first will ALMOST ALWAYS get you killed. Please do not do this as even if you do survive you’ll need to use a lot of resources to get out.
Wait until the fight starts, ideally there will be a juicy target that others will go on too. If there’s no one marker, make your own! Don’t be afraid to go for tanks, or the enemy squishy if others are able to get there with you.
I like to be in white stance for the silence, then charge into my target. Swap to black stance, melee combo as much as you can in black shift, displacement and verflare.
Mid-Game:
Focus on keeping resolution and your melee combo on around the same rolling cooldown.
Frazzle is most common for applying kill pressure especially when pushing into enemy team
Magick Barrier is most often used for defending your position/ checkpoint or when you know the enemy team is going to be using a bunch of LBs
End-Game:
DON’T spend a lot of time fighting on the point, if you do you’ll need to be in white shift for most of the time to keep yourself alive. This is viable especially when you need to defend the point by yourself in overtime.
Advanced
General:
Utilize LoS whenever possible (like the pillars on Volcanic) to still be able to melee your target while reducing the amount of enemy ranged players that can target you
You can use black resolution to bind enemies before they get to potions, then charge and steal them for yourself.
You can use displacement on enemies to flip out of LoS from enemies, or to push yourself forward into a different position to interrupt an enemy’s pot or chase down somebody trying to get away.
Silence will automatically stop someone’s pot, even when it’s gotten to the ‘slidecasting’ stage that most other damage will not prevent it from going off.
Keep track of the enemy's purifies/ guards and abuse that by using your silence if the rest of your team is fighting them or simply chasing them with black shift melee combo and beat them up
Use silences to follow up on ally’s cc to help secure kills
Opener:
Use frazzle as close as possible to when the fight actually starts, sometimes there’s a case for using frazzle on the opener but it’s certainly more rare.
If people are really going on you, be mindful of using displacement or corps-a-corps to make yourself a less desirable target.
When using silence try and aim using a target behind your actual target for extra value.
If people are going for you within your opener, try weaving in white shift once or twice on your melee combo before swapping back to verflare for chunky burst.
Mid-Game:
If you can distract 2+ members from the enemy team by dancing around in their base using displacement and corps-a-corps to kite them, then corps-a-corps back into the fight and help your team kill someone you have created huge value.
Similarly you can create space in the enemy’s team base by forcing them to come back to chase you especially if the person you’re fighting doesn’t run back to the main fight.
Be careful doing this though, as you can end up not contributing much and your team might die and lose the team fight.
Using silence or root on enemies that get pulled and rooted from DRK
End-Game:
Using a well-timed frazzle + verflare + lb on the point in overtime especially if you see anybody on your team using their lb or setting something up can win games.
Things to look for: LBs from: DRG, WHM, AST, WAR, DRK
How to Counter
CC and burst damage especially when the RDM doesn’t have a purify.
Really just focusing them when they come in for melee combo forces them to either play defensively, use white shift, or a combination of the two.
Other displacing abilities like DRK and SMN will throw RDM off their game. If you do this or run away from them when they charge you it’s possible to get them to use up their second corps-a-corps trying to catch you.
This makes them a squishy target, or very controllable/killable with roots, silences, and other CC.
Lots of AoE will mess up RDM especially if they try to fight within the team fight.
Guarding the RDM’s melee combo and burst will render them ineffective, forced to either swap to a different target or wait for the target to get out of guard.
Author: Alana Mystranquil - Coeurl
